Last updated on February 27th, 2020 at 04:02 pm
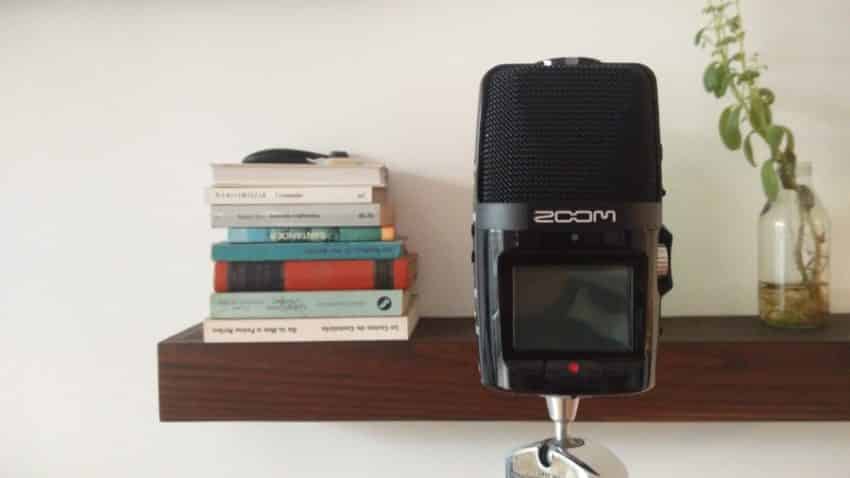
I’ve owned the Zoom H2n for over a year now and It’s become my go device for when I’m recording my own acoustic guitar plus vocal tracks.
It’s got many features and settings available, plus it can be used as an Audio Interface while connected to a PC.
In this post I will try and give you all the information on how to use everything it has to offer, the right way! But first I will give you a quick overview of all its features.
Some general information about the Zoom H2n?
This handy device, is a stereo portable recorder that has the ability to record in X/Y, Mid-Side and 2- or 4-channel surround.
It comes with 5 built-in condenser microphones, two front ones for the X/Y config and three on the back, which are stacked on top of each other. One is facing straight to the back while the other two are positioned to the sides, these last three are used when engaging the Mid-Side setting.
Everything you record with these two settings is recorded on to a stereo track.
Combining all 5 of them creates the surround effect, which will be recorded to a single stereo track if you choose the 2-channel surround.
If you go with the 4-channel surround setting, then the front or X/Y mics, will be recorded to one stereo track, and the back or Mid-Side mics will be recorded to a different stereo track.
I will be going into more detail on how to use each of these options later on in the post.
A really nice feature is that it can be connected to your PC via a USB cable, which not only allows for quick data transfer, but also lets you use the Zoom H2n as an Audio Interface with the ability to record directly into a DAW.
With many on board effects such as Low-Cut, Compression and Limiting, the Zoom H2n will get you some of the best recordings even with extremely loud sounding sound sources.
Since it comes with a free Cubase License, I will assume that you are using that specific DAW and I will show you how to use certain plugins, such as the MS-decoder, in that DAW.
Of course, if you use something like Pro Tools, the steps would be almost identical.
Let’s get into the specifics and the controls of the Zoom H2n:
When looking at it from the top you will see;
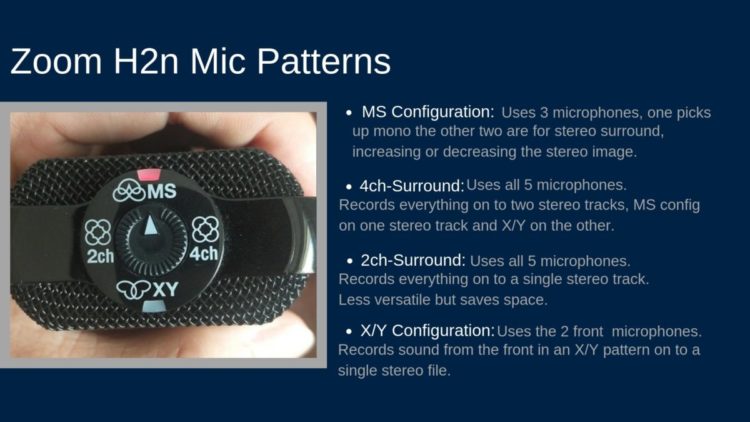
The Microphone pattern selector, which has a little image showing how the sound will be picked up.
Just remember that the X/Y capsules are at the front while the Mid-Side ones are at the back of the recorder.
This means that if you plan on using the Mid-Side setting, you need to have the back of the H2n towards the sound source.
You can also see two indicators, one at the front and one at the back, which will light up depending on which setting you chose, and will intermittently flash on and off IF the recording is clipping/too hot.
When Taking a look at its right side we see;
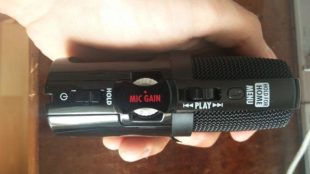
The Menu button, the play button (which also works as “selector” to browse through the tracks and the settings), the Gain Knob, which goes from 0 all the way up to 10, and lastly the Power/Hold button.
One thing about the Hold setting; It won’t allow you to do ANYTHING, which is the point, except for changing the gain settings.
Now let’s take a look at the left side of the Zoom H2n;
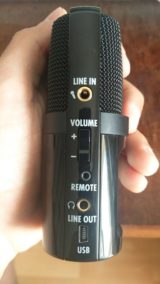
There’s a line in jack, which comes in handy if you want to connect an external mic. You can connect a condenser microphone that requires 2.5v of power. This can be turned on or off in the Plug-in power option panel.
You have the volume controls, remote input, the line out or headphone jack, and finally the USB port.
At the front we see;
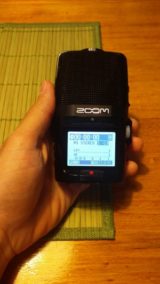
The record Button, a recording indicator which turns red if the device is recording and the black and white screen that shows the volume indicators, the recording format we are using, battery level, the selected recording pattern, etc.
Liking this so far? Don’t forget to share!
Now let’s have a look at Interface, Settings and Effects
Taking a look at the screen you will notice that you can see the level of the tracks, the mode you selected (X/Y, M/S, etc.) and the recording quality. For instance 44.1kHz/16bit.
There’s more information like play/record time, the name of the file you are playing, etc.
When Pressing the MENU button!
The first item on the list is, “Folder”.
This one lets you select in which folder you want to save the files you are going to record. The selection of folders will change depending on if you are recording in stereo or the 4-channel setting.
Next Item on the list is “File”.
Here you can see all the recorded files. When selecting a given file, you will have the option to;
See the whole information of it (Name, date of recording, length, format, etc.).
You can rename them and MP3 enconde them, which will convert WAV files into MP3.
The normalize option will raise the level of the recording so that the maximum level in the file is 0dB.
There is also the divide option which will divide a file into two, you just have to select where.
When clicking on the mark option, you will be able to see the marks that you may have created. (I’ll explain how to create them in the “record” section a bit further on).
Lastly you can either delete that single file you selected, or delete all!
Next one on the list is “Input”.
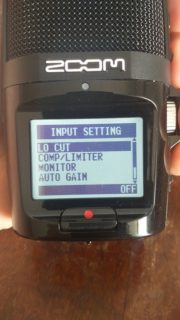
This is the most useful part in my opinion.
Here you will find the Low-Cut Filter, which sadly doesn’t allow you to switch between different configurations, can only be on or off.
The Comp/limiter configurations, which come with a General, Vocal and Drum compression Config. And a General, Concert and Studio limiter config.
Compression will decrease high levels and increase lower ones.
The Limiter reduces the high levels that exceed a set threshold.
The monitor option can be set to Home and Rec, always on or always off. The home and rec option will only allow for monitoring while recording and while you are at the Home Screen.
Through the Auto Gain option, you can Select the Concert option, which is for loud settings, the Solo option, which is aimed at acoustic performances and the Meeting option, which is best used for low volume sources.
Note: As soon as you choose an Auto Gain setting, the Mic Gain Dial will stop working. Also, this can’t be used at the same time as the Automatic recording function.
Last option in the input settings is the Plug-in Power one. Turning this one allows it do drive condenser microphones that use 2.5v power, that you connect into the 1/8’’ mini phone jack.
This just about covers the options under the Input menu.
The next one on the list are the “Rec” settings;
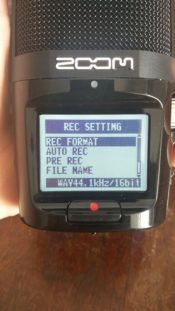
You can change the recording format: From 44.1kHz/16bit all the way up to 96kHz/24 bit. Except in 4-channel surround mode, this one doesn’t support 96kHz/16-24bits.
MP3 is also available, should you want your recordings not to take up as much storage.
Auto Record will allow you to automatically start recording after the sound level surpasses a certain threshold.
Pre Rec: Turning this option on will always record, deleting everything that is being recorded but keeping two seconds of it. Once you press the record button it will add those 2 seconds to your recording.
File Name: Will allow you to change between the default name which would be something like Zoom0001(XY).wav, or date name, which names it after the time of the recording.
Play key function: This will allow you to mark the files you are recording when hitting the play button, without pausing the recording.
You can set the recorder to pause when you add a mark during recording. This won’t work with MP3 files.
This is useful if you are recording a meeting or a podcast and you want to mark certain parts of the recording, allowing you to jump to those parts easily.
Spatial Audio: By using with a 360-degree camera, you can use your H2n as a 360-degree VR microphone for live streaming on Facebook and making 360-degree video for YouTube.
That’s it for the recording options.
Next one is pretty short and simple; Tools!
Here we find a Tuner and a metronome, pretty straight forward!
Now we have the System tab:
Here you can change the Date and time as well as the back light, display contrast, battery type, software version and you can do a full factory reset.
SD Card and USB Options;
Lastly you have the SD card and USB options, where you can choose to format the Card and to use the Recorder as an Audio Interface or as a standalone recorder.
Ok, now that we have the boring, yet important stuff out of the way… let’s get into the fun part!
Which microphone pattern and settings to choose?
Even though this is mostly a matter of preference, there are some situations where it might be best to choose one over the other.
I will go over four different situations;
Solo performance, ensemble (acoustic performance of 3 or 4 participants), live band/rehearsal recording and recording conversations/meetings/podcast.
Solo Performance:
In this case, the sound source will just be coming from one direction, the is absolutely no point in recording with the surround option, since it will only add to the ambient sound.
You should almost always use the X/Y setting. This is because the microphones will only pick up what is in front of them, ignoring ambient noise for the most part.
Your recording will sound present!
The Mid-side configuration can also be used in this case.
The basic difference between Mid-Side and X/Y is that, the “mid” microphone is facing the source directly, getting a mono image of it! The Side microphone (in the Zoom H2n’s case two microphones), face to the sides.
You can control the volume of the side signal, increasing or decreasing the width of the stereo image. This may add a bit more room sound than X/Y.
You have the ability to control this with the “play”button, if you push it upwards you DECREASE the side microphones level, if push it downwards you INCREASE it.
X/Y is also stereo and can be edited quite a lot, but it’s not as versatile.
Make sure, no matter which of the two you are using, to check the levels on each side. Both the right and left channel should be about even in volume.
I wrote an article on the differences between X/Y and Mid-Side, make sure to check it out!
Important note: In order to use the Mid-Side Decoding software properly, you need to record using the Mid-Side Raw format. This setting can also be selected using the “play” button, pushing it downwards.
You can download the Mid-Side Decoding Plugins from the Zoom website, which will allow you to control the Mid-Side configuration in Post.
Later in the post I will actually show you how to use it, with images.
The effects, like Compression, limiting, etc. shouldn’t really be used in this case.
Just set the gain properly and make sure that during the loudest part of what you are recording, the recorder doesn’t clip. I find that adding compression or a limiter, sometimes makes the recording sound a bit dead.
Just get the best recording you can and add all the effects in post.
I wrote an entire post on how to record acoustic guitar and vocals using just the Zoom H2n, plus some plugins you can use and how to use them (which are all FREE).
Note: While recording acoustic or classical Guitar with the Zoom H2n might be easy to do, if you’re truly looking for the best sounding alternative you should consider investing in some Stereo Pair Microphones.
These are the ones typically used to record acoustic guitars and they sound better.
Recording an ensemble:
In this case, there are many benefits to using the Mid-Side configuration over all the others.
First, you get a wider pick up pattern, since the X/Y is pretty narrow, 90 degrees.
Let’s say you have three musicians, one positioned in front of the recorder while the other two are positioned at the sides.
With Mid-Side you will be able to record them all perfectly, plus you can emphasize or de-emphasize certain parts of the song, by increasing or lower the volume on the side mics.
By this I mean that if the musician standing in the middle has to play a solo, by lowering the side mics a bit, you automatically make him sound more present.
If you have a lot more musicians, you could use the surround option and place the recorder in the middle, but I personally don’t like it as much.
Should you add Compression or Limiting?
I don’t think there is much of a difference when recording an ensemble and a solo acoustic performance, IF the people playing know how to keep the dynamics as they should be, and not suddenly get a spike in volume, etc.
IF that happens, then sure! Add some slight compression, but like I stated earlier, you will be much better off adding those effects in post!
Recording a live band or rehearsal:
Usually you will record a band, while facing the Zoom H2n towards it. Very rarely will you have to set it up in the center of the band.
In that case go with the X/Y configuration.
If there is no other alternative, but to place the microphone in the middle of all the band members, go with 4-channel surround, since it will be a bit more editable than 2-channel surround.
One important tip for recording bands, especially when they are extremely loud is to, go to the comp/limiter options and choose the Drum compressor.
After that, turn the gain all the way down to zero… yes, ZERO.
This is a great trick for really loud situations, which won’t get your tracks distorted and they will always sound good.
Recording a conversation/meetings/podcast:
In this particular case, if you have many guests, or if it’s just two but you are sitting on opposite sides of the table, go with any of the surround options.
You could add some compression mainly to keep the level the same, since it will not only compress the louder volumes but also raise the lower ones.
Use the Zoom H2n on a camera:
If you need to record a video with live audio, the Zoom H2n can do this for you. You will probably need to buy a camera mount for it, but it’s totally worth it if you want a better recording quality than what the camera’s built-in microphone can do, plus they aren’t expensive at all!
It is also recommended that any professional video production have a backup audio plan in case something goes wrong during production, which sometimes might go unnoticed until editing… then it’s already too late!
How to transfer the files to you PC:
You have two options here;
Either connect the Zoom H2n to the PC using a USB cable. It will ask you how you want to use it. In this case you should choose the SD Card Reader option.
After this it will be accessible through “My PC” just like any other storage unit.
Or the other option would be to remove the SD card from the bottom and inserting it into an SD card reader.
How to use the Zoom H2n as an Audio Interface:
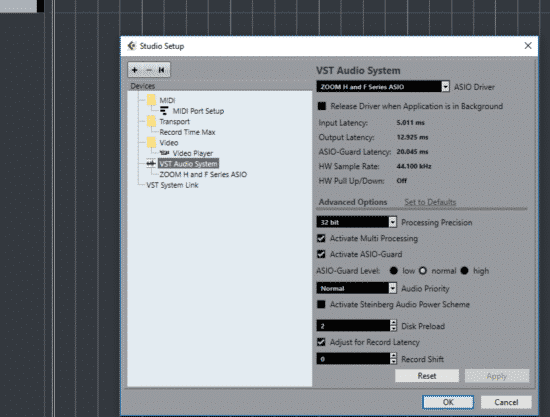
Connect it to the PC using a USB cable. Next Open Cubase (which comes with the recorder for free). If you use another DAW this shouldn’t be an issue.
Click on “Studio” and go to Studio Setup. Next click on VST Audio System and Select Zoom H and F series Asio as your driver.
And that’s it! You can now use it to record, being able to change between all recording modes, changing the gain, etc.
For playback you have two options; listen through the headphone output of the H2n or you can change the settings in windows;
Simply select the speakers for playback instead of the H2n and make sure that the H2n is the default recording device…
Mid-Side Decoding:
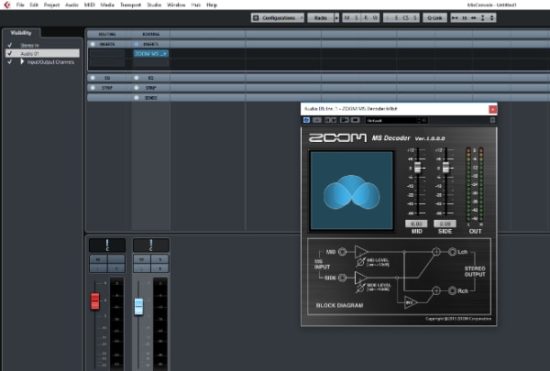
This is a cool plugin you can download from the official Zoom H2n site, it allows you to adjust the stereo width of the Mid-Side recording you just did.
Once you have a track recorded with the Mid-Side setting, just go to the mixing console (F3 in Cubase), click on inserts and add the Plugin to the chain.
It’s fairly simple to use, only two faders, one for the Mid microphone’s volume and one for the side ones. There is a visual representation to the side, showing you how much of a stereo image you are getting.
Important note: In order to use the Mid-Side Decoding software properly, you need to record using the Mid-Side Raw format.
I Use this recorder a lot for playing outside, since it’s so portable and light!
If you are trying to record some songs outdoors but you keep getting those annoying wind plosions/noises in the recordings, check this article I wrote on how you can avoid them!
Conclusion
The Zoom H2n is fairly easy to use, you shouldn’t have a hard time getting some great sounds out of it!
Just make sure to choose the most appropriate Mic Setting that meet your needs and have fun recording!
And don’t forget to play around with the Mid-Side Setting and with the Decoding Plugin, you can generate some cool stuff with them!
Anyway, I hope this was useful! See you on the next one!
Cheers
Hello,
I recently used the Zoom H2n at a Festival to record my band. The H2n was connected into the Sound desk but despite being plugged directly into the desk and picking up my band, it unfortunately picked up the conversations that the guy at the sound desk would have with various people near the desk. Is there any way of muting the external mics and for it to just record what’s coming from the sound desk as I wanted the recording of the band and not the conversations by the sound desk guy.
In addition to the H2n, I was also using :-
Pro Signal PSG02973 XLR Attenuator Adaptor, 20dB; and
TISINO Dual RCA to XLR Cable, 2 RCA to 2 XLR Male HiFi Stereo Audio Connection Microphone Cable Wire Cord Path Cable -1m
My band are due to perform another gig in a few weeks time and I just want to make sure that the recording is spoilt next time around.
Thanks.
Facundo, thank you for this. I’m a bass player and I bought my H2n in 2011 mainly to record rehearsals so I could review stuff I had to learn, it’s an awesome tool. I have checked out the settings but never really had to delve in to them until now. The drummer in the band I’m rehearsing with now is a bit loud and so I had to reach for the compressor settings to avoid my recordings being overpowered by the drums (we rehearse in a small space). Not having used the settings for such a long time I was a bit rusty so I did a google search and found this site.
Comprehensive, clear and concise instructions on how to use the H2n, Zoom should have hired you to write their manual.
Totally awesome, thanks a million for this.
Bridges
Hello!
I tried to use the Zoom H2n as a microphone for online conferences, but it seems to produce a crackling sound on the other end. Do you have any tipps on that? Does it serve well for that purpose at all and if so, would you be so kind to tell me how to set it up?
Do I need to use Cubase to have it working as an audio interface?
I’m very new to all this, so would appreciate the right guidance.
Thank you so much!
Best wishes, Vera
Hi. I have question. When I choose to playback any file there is side effect like rhythmic tinkle, I can’t find where turn it off and for what this sound is used for.
Hi there – am wanting to set this up in the woods to auto record any sounds that might happen overnight. But not seeing a good guide on how to setup and use the auto-record option. Also does it keep a 2 second buffer of audio prior to auto-recording – was told that it might. Thanks
You can set it to auto record as well as pre record. I don’t know how much battery it’s going to consume, but I assume that it will run all night (pre record constantly records but only keeps the previous seconds after it actually starts recording).
It has been at least 15-minutes since I asked my last stupid question so I’m overdue – so hear goes. If you’re using the X-Y mode the sound source must be on the monitor side of the recorder. If you’re using MS mode, since the mid-mic is facing directly outward off the middle of non-monitor side, the sound source should be on the non-monitor side of the recorder, correct?
Exactly. When recording using X/Y, face the mic towards the sound source (with the side where the screen is facing the source). With Mid-Side it’s the other way around (face the back of the mic towards the sound source). I hope this makes sense.
Hey Facundo, hello chat!
My H2n is just arriving, I’ll be using it for the main audio recording device for my motovlog. My (prlly stupid) question is: is it possible to record with the H2n with a lav-mic and its built in stuff at the same time? I’m planning on recording the engine sound with the device in my pocket, and my lav mic in the helmet…
Very nice article, thank you for writing this.
I have an H2N and when I use it with my PC as a USB mic, sometimes it works perfectly, and other times my voice on the other end of a Zoom conf call sounds like a super bass heavy version of my voice. Think Barry White, which I sound nothing like, and without any rhythm IF I were to sing. Zoom support told me to download their latest ASIOs, which I did, and that it was likely a sampling rate issue, though I still can’t figure out how to see/change what my PC (Windows 10) or Zoom (Conf app) sampling rate settings are. Any recommendations? Thank you!
Hey Calvin, sorry to hear that!
I honestly don’t know what this issue could be since I never had any problems with my recorder.
Can you take advantage of the warranty and get a new one?
Thank you for this very clear and helpful guide.
On my H2n I have noticed that when playing back over its internal speaker or using headphones there is a steady pulsing or throbbing effect, almost like slow vibrato! This happens whether I power the H2N with batteries or mains. The pulsing is not present when I play back recordings using my PC’s card reader.
Also, when I use the speed variation function on playback, the sound is distorted as though it is under water.
Have you heard these effects?
Perhaps there’s a problem with my unit?
Hey Robert, to be honest this seems a bit strange… I never happened to me.
Did you contact Zoom about it?
Hi, thanks for the tutorial.. Excellent. Can I use H2N as a microphone during a ZOOM or WEBEX webinar on my PC?
Hi there,
I’m going to use this gear to record my band rehearsal.
The room we will use is pretty big. But gear is oriented to the center of it.
What do you think it will be better:
Place the recorder in the middle of us (middle of the room)? (this way will be close to the drums)
Or
Place the recorder as far as I can from the drummer and record from there.
Couple of questions more:
Which is the better way to place the recorder? Vertical or horizontal?
Can you suggest which mic combination should give us better results?
The post was really helpful. Thanks for sharing!
Thank up.
Excuse my ignorance, but where would I get the MS decoder, and the driver?
I presume they’re online somewhere ready to download.
Is that correct?
Thanks for your help.
Facundo, thank you so much for posting all this detail. I really need it. I’m not a total tech dinosaur, but close. I have a Zoom H2N that I bought second hand. As a result I don’t have to necessary code to download the Steinberg software. I’ve approached Steinberg, and they are considering helping me out. I wanted to ask you. What updates do I need for my device. Should I download everything. Do I need to connect the device to the computer to do this. Excuse my ignorance. I’m just trying to get this device up to speed, so that I can use it for acoustic guitar recording–my passion.
Thanks for your time.
David
Hey David!
In all honesty, I haven’t downloaded the 3.0 Firmware yet, but you could definitely do that.
Other than that just get the MS decoder and the driver and you should be set!
Have a great day!
Facundo,
Thank you so much. I’ve been on the zoom site and found the downloads for the MS Decoder and the Driver. But I’m confused as to whether I just download them to my computer, or they need to be downloaded onto the device somehow.
Also, I note (from your audio samples” that you recorded steel string, acoustic guitar. That is exactly what I want to use my H2N for. I would be interested in the settings you use.
I’m not looking to record to publish, or share, but, rather, to check whether I am playing something correctly. I’m deep into fingerstyle and slide, learning one phrase at a time, and listening back would be very useful to ascertain whether I actually HAVE the correct feel, or I just think I have Lol.
cheers,
David
I
Hey David, you can download the software here: https://www.zoom-na.com/products/field-video-recording/field-recording/zoom-h2n-handy-recorder#downloads.
The MS decoder only works to manipulate the stereo field within your DAW. If you’re not going to be doing that then it makes little sense to download it.
As far as the settings I use to record acoustic guitar, it’s mainly the X/Y configuration; I don’t add any compression or anything from the recorder itself.
I just make sure that the levels are set correctly, meaning that there is no clipping going on, and that’s it.
I Wrote a post a while ago where I explain how I record using the zoom h2n, check it out if you want ( https://thraudio.com/record-vocals-and-guitar-zoom-h2n/ ).
I hope this helps!
Have fun recording!
Facundo, what a great posting!
I’m looking to record a grand piano in a studio setting – do you have any recommendations for settings? I am assuming no compression, etc. to retain dynamics, but XY or MS? Also, thoughts on placement – where, how close to the piano?
Thanks!
Hey – thanks for the great article! I use the H2N to record classical guitar for my teacher to critique. What I’m finding is that dynamics/volume changes in the room don’t carry through to the recording?! It seems to equalize the recording. I don’t use any compression, limiting etc on it. Just wondered if you might know what I could be doing wrong?!
Thanks
Matt
Hey Matt, I find that very strange since I use it quite often and don’t have any of those issues.
Did you double check to see if the compression/limiting is turned off?
Hi Facundo
I have just placed an order for the H2N. Purpose is to record my young son singing with karaoke music playing on my iPhone ported on a wireless speaker. Can I play the music directly on the H2N so the recording is clearer?
Thanks
Purnima
Hello, thanks for your interesting write-up! I got a Zoom h2n and i’m trying to record a dj set from the mixer! i tried directly from the mixer but its too loud! so i’ve wired it via the phono leads to the amp out to control the line level. its works kind of but the mic is still on? am i using the wrong leads from the line out to the Zoom h2n?
Am using two phono leads into a single line adapter!
Hey there!
Thanks for posting this.
I have one issue. After I downloaded Cubase LE, my microphone stopped working on my computer as an audio input. Nothing meters. My laptop selects H2n as a microphone but Cubase does not see it as a microphone and instead only shows my laptop mic. Also, I do not get the Zoom H and F coming up as a driver in Cubase. Any ideas as to what might have gone wrong?
Hey Haylay, how are you?
In all honesty, this never happened to me.
Have you tried messaging Zoom?
Finally after much trial and error, I think I have found the key to activating the Play mode. When the recorder is first turned on, it is ready to record. If at that point the center button of the selector is pressed, it switches to
Play mode. This mode cannot be accessed via the File menu. It can only be reached through the Record mode. All attempts to play a file selected from the File menu are doomed to fail. This way of accessing Play is working for me and is repeatable. I only wish the Zoom folks had put this information in the manual. It would have saved me a lot of time and frustration.
The H2n can also play your files, via the internal speaker or external headphones. The directions for selecting and playing files is identical to the directions for “checking file information,” except that to play files you are supposed to start in PLAY MODE. Unfortunately the manual does NOT spell out how to get into PLAY MODE. At random times I have been able to play files. This works for a while, and then it somehow hops out of PLAY MODE, and no matter how many times you try it, it will not play the file. This is infuriating, as the only recourse is to pull the SD card and put it in a computer. Does anyone know how to get control of this?
Hey Stan, sorry to hear that.
To be honest, I’ve never had this issue and I use that function quite a lot.
I’d recommend that you contact Zoom directly since there may be something going on with your recorder.
Have a nice day!
Hi, thank you so much for this post. Can I please just clarify something, although it does appear clear. I have a Zoom H2n and wish to record a podcast, two people, one sitting either side of the microphone. So, I’m thinking 2ch? How do I add compression? and would I need to alter the M/S setting (stereo width) if recording in 2ch? Finally, should I record a podcast audio recording in a particular format? MP3? Wav?
Kind regards,
Haseeb
@filmsweshouldhaveseen
Hi Haseeb, just use the 2ch surround mode and that’s really it.
I wouldn’t add compression because you can then do this directly in your recording software, which is a better way to go about it.
Also, using MP3 of WAV is completely up to you. Since it’s a podcast and you don’t need extreme detail in the audio, going with MP3 might be better since you can record for a much longer time.
I hope this helps!
Hey Facundo,
Great guide, Thanks!!
I purchased the Zoom H2n recently and it has upgraded greatly the rehearsal recordings of our 12 people vocal ensemble. I am mainly using MS RAW and later taking it to Cubase for MSED processing and minor touch-ups.
ALAS! the other day a lent the mic to a friend for son’s graduation piano recital. The mic was connected to a video camera, placed on a tripod facing the open grand piano in XY mode. The input settings were set to Auto Gain and one of the Compressors (big mistake). Although the resulting sound quality was very good, the dynamics were FLAT. Trying to rescue this recording I found another recording made *simultaneously* of the same session using a simple smart phone. The audio quality is of course mush lower, but the DYNAMICS are there, unharmed, with all the crescendos and diminuendos in place.
Now my question: can I, in Cubase or any other method, use the dynamics of the smartphone audio and impose them on the ZOOM audio track?
HELP!!! thanks
I thank who ever participate in the writing this helpfully notes.I am increasing the value of my H2n
Hello sir
Thank you for a great tutorial. But one thing is not mentioned. I am trying to record from my receiver directly into the device.
I have a karaoke mixer which mixes my voice with a track directly fed into mixer. From mixer it goes to my receiver and I am trying to record into this device connecting receiver output(red and white) to the In line jack of this device. Recorded volume remain low no matter what I do.
Can you suggest what to do? Is there anything in setting that needs to changed or this device is just not meant for recording from in line sources.
Thanks
Hey! Sorry to hear that!
In all honesty, I have never tried that, so I couldn’t tell.
Have you tried reaching out to zoom?
If you do and they give you an answer, please let me know xD
Have a nice day!
Thanks so much for taking the time to write this guide – it was incredibly helpful!
Hi, great article!
I’m traveling with my daughter’s high school marching band for competition this weekend and will be taking my Zoom H2N with me to get a good recording of their show.
I will be on the sideline and using a selfie stick to elevate the recorder above our heads to get a good shot at capturing the audio. There will be a crowd behind us in the stands watching the performance.
Which audio setting do you recommend for this situation to get the best audio I can?
Thanks!
Hello!
Thanks for this useful resource! I am trying to record video with a Nikon D800 and my Zoom H2n. I have an attenuator cable to connect the two. But when I go to review a video on the camera playback with headphones I can’t hear the sound. Is there something I’m missing?
Hi,
first of all: great tutorial, really helped me!
I have one problem: When I’m using the mic with an SD Card everything is working fine, I get a great sound! But as soon as I connect the mic to a computer as an audio interface the audio sounds terrible and like the mic overdrives even though it isn’t. Do you have an idea why that could happen?
Thanks a lot,
Max
Hey Max, so sorry to hear that!
To be honest I’ve never had this issue, so I don’t really know what the problem could be.
Have you tried contacting Zoom directly?
If you do figure out what the issue is, please let me know what it was!
I hope you can fix it!
Not sure what you mean by the mic overdrives, but are you sure the Zoom is the selected sound input? Just getting this out of the way first…
Also, the article says you have to use headphones, but you don’t really have to. Just select the zoom or your regular speakers. You can use only the zoom mic or only the zoom output independently if you want.
Good luck!
Hi,
Many thanks for the entry!
Please note that on the back there’re just two micros one of them with a cardioid/polar pattern recording mid sound as you explain and the other with an 8 pattern recording sounds from the sides.
Cheers
Juan
Hi there!
Just to be sure I checked the Zoom’s official website and it has three microphones on the back, 5 in total.
2 on the front for the X/Y pattern and 3 on the back.
Thanks for your input!