Cymbal Bleed can completely destroy a drum recording, especially once compression is added since it raises the noise floor.
In this article, I will go over the multiple methods you can use to remove Cymbal Bleed, from using plugins specifically designed with this purpose in mind, to more creative ways (some of which are free as well).
TLDR: How to Remove Cymbal Bleed
Use a Noise Gate that is specially designed to deal with Cymbal Bleed (such as deBleed).
Create a Copy of the track, invert the polarity and put a compressor on one of the tracks.
Use a Multiband Compressor in Expander mode on the higher frequencies to trigger on the transients with a quick release.
Use a traditional Noise Gate and fine-tune the Sidechain Filters.
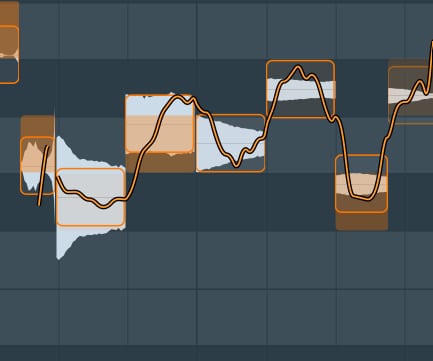
The Audio Example I will use (Snare with a lot of Cymbal Bleed)
This is the recording of a snare drum with with a ton of hi hat bleed, which is extremely difficult to remove without completely butchering the tone of the snare drum.
I will also be showing how every different way of removing cymbal bleed affects the audio below.
Use a Specialized Noise Gate designed to remove Cymbal Bleed
Specialized Drum Gates, such as deBleed, have been carefully designed to process the cymbal frequencies separate from the other components of the kit, allowing you to have a long release time on the kick, for example, preserving all of the body and tone of the kick drum while still removing all of the cymbal bleed.
With deBleed it’s as easy as loading the plugin on the desired track, selecting one of the four input sources (“Kick”, “Snare Top”, “Snare Bottom”, or “Toms”), and setting the threshold as well as the level of “debleed”.
Or you can choose to let deBleed set these values automatically for you by clicking the “Analyze” button.
Here’s how it sounds:
In this example, the Hi Hat is extremely intrusive and overpowering but deBleed manages to remove 99% of the Cymbal Bleed without affecting the tone of the snare at all.
This is the quickest and most effective way to solve the problem by far, but here are a couple more tips that can also work really well!
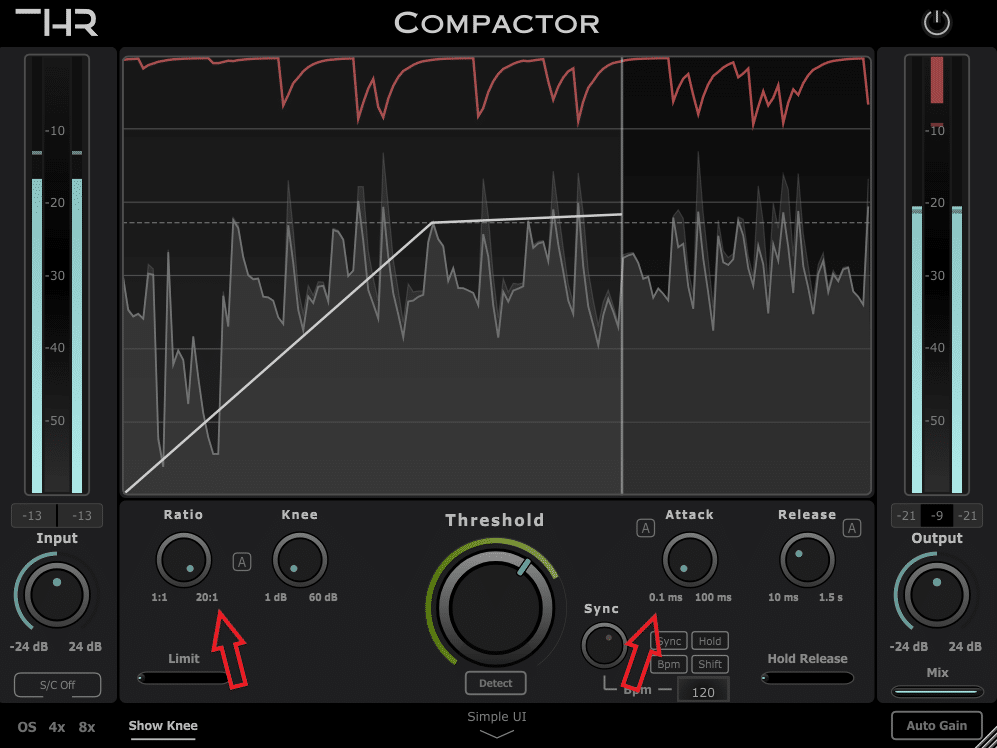
Duplicate the track, invert the polarity, and add a Compressor
This is a very effective trick for removing cymbal bleed and it can be done with any stock compressor for free (I will be using Compactor to showcase how to do it).
You need to do the following:
Make a copy of the track.
Invert the polarity of the newly copied track (Flip the Phase). This cancels out the audio, you should hear nothing.
Load a compressor on one of the two tracks (not on both) and make sure auto-gain is off.
Set the ratio to 10 or higher (almost limiting territory).
Set the knee to the lowest possible.
Lower the threshold until you can hear the part of the kick you’re gating (Kick, snare, etc.).
Use a Fast attack setting (generally as close to zero as possible).
Use the release time to control the amount of bleed.
While this method doesn’t work as well as using a plugin like deBleed, it is still highly effective and easy to implement.
Here’s how it sounds:
As you can hear, this method will drastically reduce the amount of cymbal bleed while still letting some of it through on the transients.
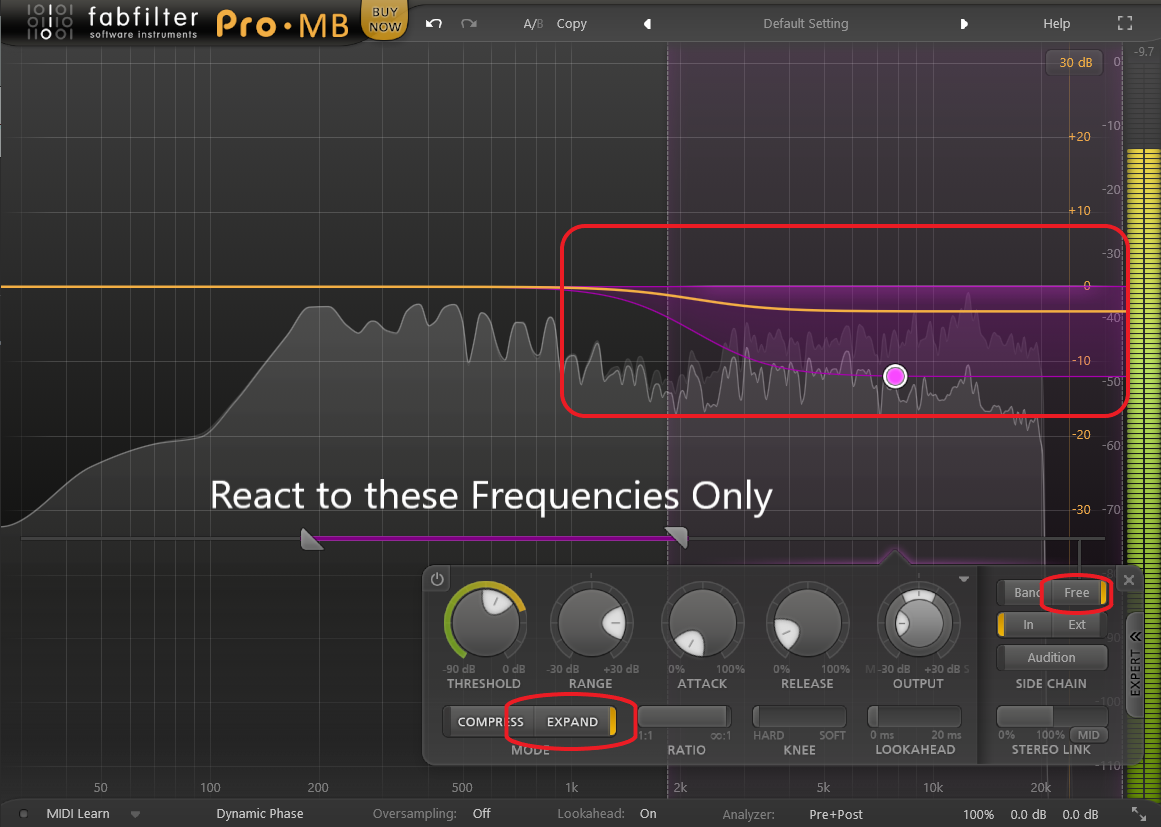
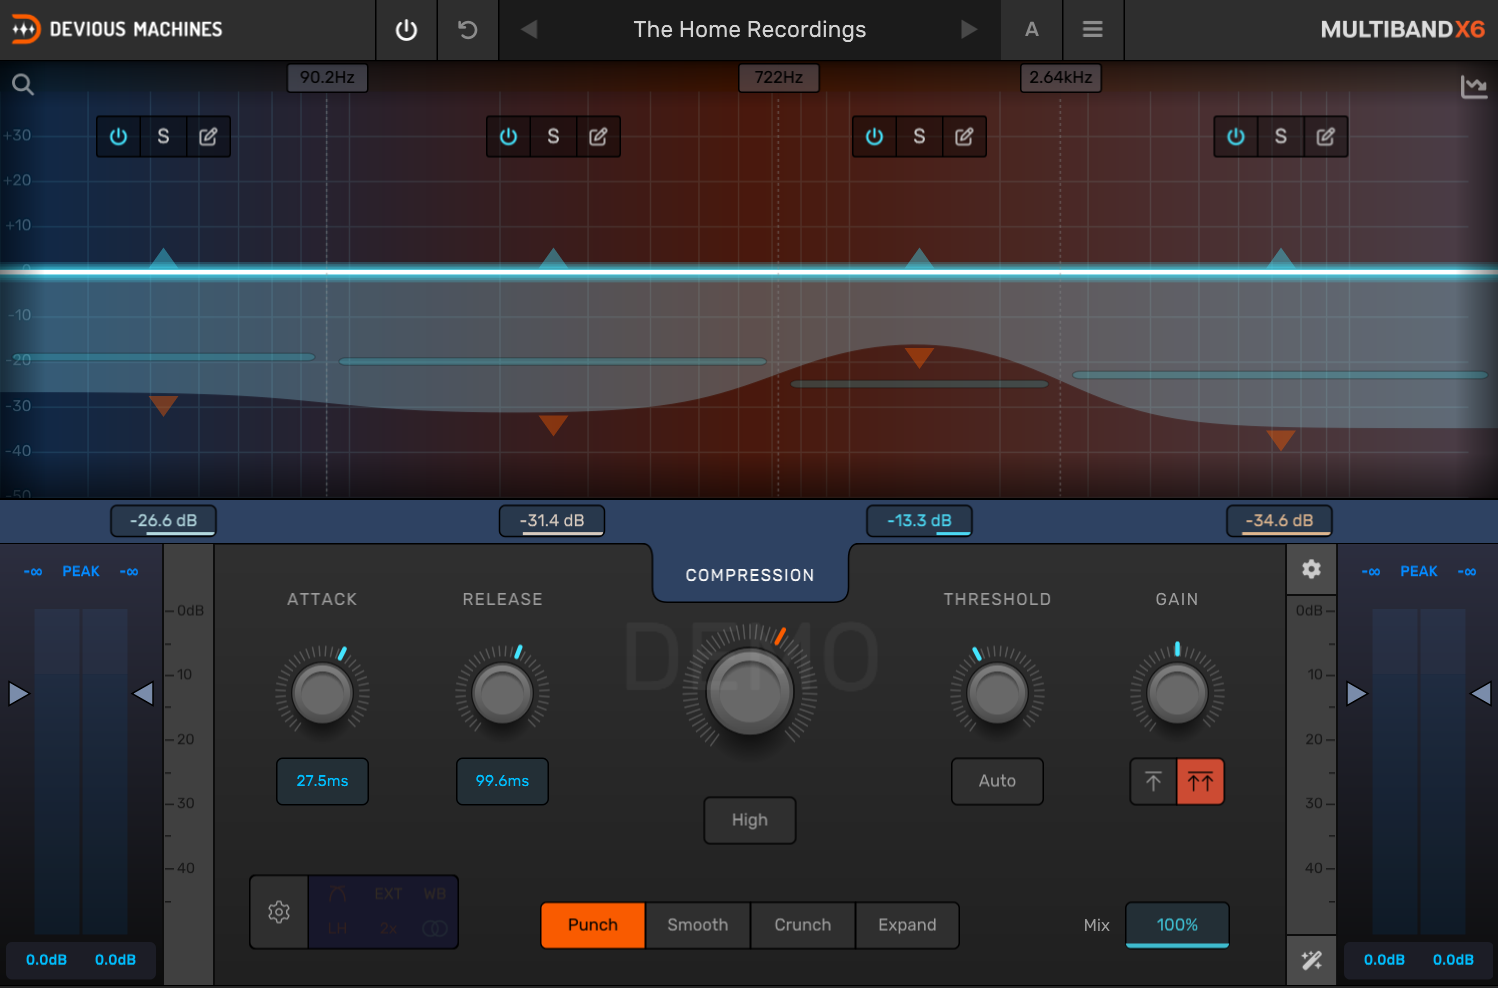
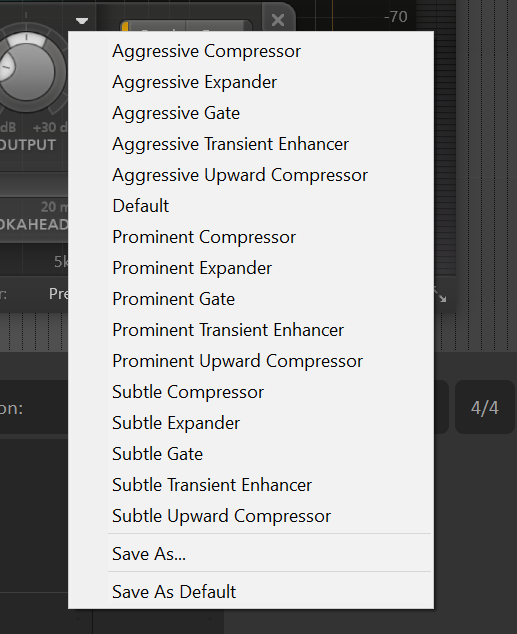
Use a Multiband Compressor in Expander Mode
You can use a Multiband Compressor in expander mode and make it lower the volume on the cymbal frequencies except when the transient of the kick, snare, or toms hits, allowing the initial hit to get through retaining some of the tone of those components, but then quickly lowering the volume of the upper frequencies.
Below, I will showcase this using the Fabfilter Pro-MB:
Set the Compressor to expander mode.
If possible, set the sidechain filters to the frequencies of the component you want to gate so that it doesn’t trigger with the cymbal hits.
Lower the threshold to roughly -12dB (going more extreme can also work).
Set the range to the same value as the threshold but positive (+12dB in this case) so that it lets the signal completely through when the transient hits.
The Attack should be the fastest possible.
Use the release to control the level of cymbal bleed (faster release times result in less bleed but may affect the tone of the components, especially the snare).
This way of removing cymbal bleed, while somewhat effective, doesn’t remove it as much as the previous two methods I described, and it also affects the tone of the snare a lot more.
In fact, it never silences the cymbals but rather just lowers their overall volume.
Here’s how it sounds:
Another drawback is that it takes more time to set up properly.
If you want to work fast, deBleed is a better tool (it also removes cymbal bleed a lot more effectively).
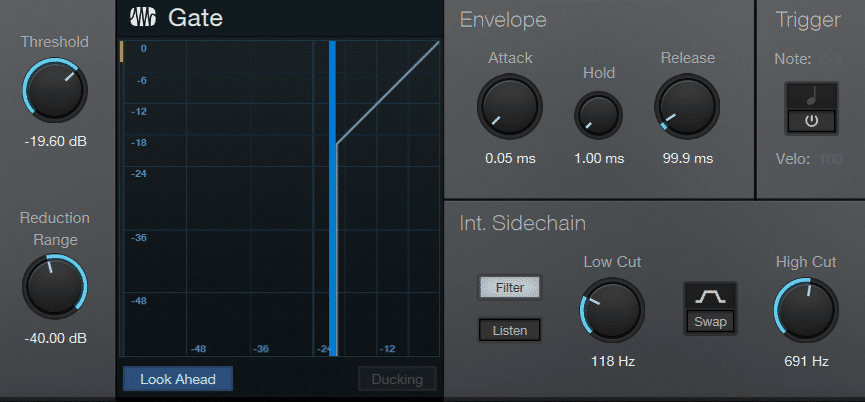
Use a regular Noise Gate (Stock Gate works)
Traditional Noise Gates can still work well to remove Cymbal Bleed but they need to be fine-tuned, plus they will never remove as much bleed as plugins like deBleed can (or even the compressor trick I mentioned above).
The issue with traditional gates is that they don’t allow you to process the cymbal frequencies independently from the rest of the kit, meaning that in order to completely cut out cymbal bleed, you will need to use fast release times, but this will also completely kill the sound of the drum components you’re gating.
Here’s how to set it up the right way (I’ll be doing it on a snare drum as an example):
Load any noise gate on the required track, and yes, stock gates will do (doing it on the snare in this example).
Set the threshold so that the transients of the snare are barely above it (you only want the snare to open the gate).
Enable the sidechain filters and set the low pass filter (or high cut filter) to roughly 1500Hz and the low Cut filter (or high pass filter) to roughly 200 or 300Hz depending on the snare (this allows the gate to only work in that frequency range so that the kick, for example, won’t trigger it).
Set the ratio to a high value.
Set the attack time to the fastest possible.
If the gate has a range parameter, set it to the maximum value.
Set the release so that you can hear the snare while minimizing cymbal bleed (usually really fast release times).
This method is the one that tends to work the least since it affects the tone of the snare a lot unless you let quite a lot of bleed through by increasing the release time.
However, this can create an even bigger problem than having a lot of constant cymbal bleed since now the cymbals can clearly be heard coming in and out, which is even harder to deal with in the mix.
Here’s how it sounds:
The pro of this method is that it’s quite easy to set up and all DAWs come with some form of stock noise gate plugin.
Summary & Recommendation
To remove cymbal bleed you can either use a dedicated noise gate designed to deal with cymbal bleed, such as the THR deBleed.
You can also duplicate the track, invert the polarity and add a compressor to one of the tracks to cancel out the cymbals while letting the rest of the signal through.
Multiband Compressors can also be used when set to work as expanders.
Lastly, and the least effective method of all, you can use a regular noise gate.
The best way by far is to use deBleed, but the compressor trick also works really well.
Mastering compressors are the most important tool you can use to give your mix the final touch it needs, especially when trying to glue the mix together and make everything sound more cohesive.
In this article, I will be listing the absolute best compressor plugins you can use to master your mix. I have tested all of them extensively (and many others as well), ran a series of tests that you can find more info about below, and these are the ones I think are worth checking out.
I will be reviewing these plugins and running them through a series of tests, such as loading as many instances of the plugin as possible before artifacts appear during playback, and more.
Here’s a brief description of the testing process:
Technical performance: Tested with Pluginval and Auval, loading as many instances of the plugins as possible on different tracks before audio playback is affected, testing oversampling, aliasing, latency, and more factors.
User experience: From installation to actually using the plugin.
Sound quality: Self explanatory.
Economic Factors: Taking the maximum and minimum price of roughly 20 plugins of the same type and comparing that to the price of the plugin.
Compatibility & Plugin formats.
Plugin-specific Features: In this case, if they have auto makeup, auto attack and release, sidechain processing, etc.
Note: I tried a lot more compressors than the ones on this list, but these are the ones I found to be more suitable for most people, be it because of their price-to-performance, or just overall feature set, usability, etc.
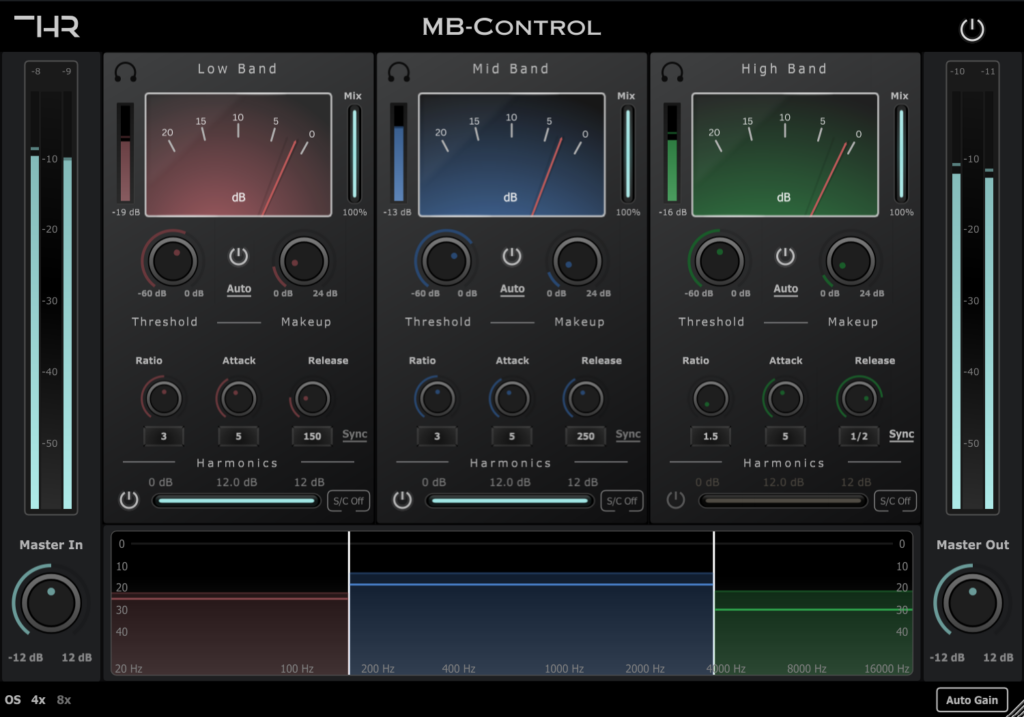
Released at the end of November 2023, the THR MB-Control is a new addition to the plugin market and is designed to make multiband compression as simple and intuitive as possible.
It offers three distinct bands which can be manipulated independently to adjust the way your tracks, buses, or entire mixes sound.
To make things simple, you have access to a handful of ratio, attack, and release values, as well as the option to enable the auto-attack and auto-release functionality, and if you really want your compressor to groove with the music, you can choose to enable the release-sync feature which synchronizes the MB-Controls’ release time to the project’s BPM.
One of the stand out features of MB-Control is its Automatic Gain Makeup functionality: Proper auto makeup gain is quite hard to implement even in regular full-band compressors, not to mention on multiband compressors, but MB-Control does offer this feature which lets you focus on hearing how the compressor is affecting the signal without getting influenced by volume changes.
In addition to this, a saturation module for each band can also be used to add brightness and personality to the sound, and all of this without affecting the output level.
MB-Control also offers externalsidechaining compatibility, which allows for advanced compression techniques, such as ducking and pumping effects, as well as 4x and 8x oversampling to reduce aliasing and improve audio quality.
CPU Consumption & Scalability (Max Simultaneous tracks…)
307
10
Average
10
Criteria
Value
Score
Installation, DRM and Licensing Restrictions
Simple Installer (no extra steps)
10
Free Trial Availability
7-days
10
Interface Look and Feel, Intuitiveness, Responsiveness
Very responsive and intuitive
10
Ease of Use
Beginner friendly
10
Documentation and Learning Resources
Written Guide
9
Update and Support Policy
Lifetime Updates
10
Average
9.83
Criteria
Value
Score
Sound Fidelity, Sound Options
Transparent sound
10
Artifacts/Distortion
No Artifacts or Distortion
10
Average
10
Criteria
Value
Score
Price
$49.00
Min Price of Similar Plugins
$29.99
Max Price of Similar Plugins
$199.00
Average
8.99
Criteria
Value
Score
Formats
VST3, AU, AAX, 32-bit & 64-bit
10
Compatibility
Windows, MacOS, Linux
10
Average
10
Criteria
Value
Score
Auto Makeup Gain
Maintains perceived loudness almost perfectly.
9.5
Auto Attack & Release
Yes
10
Mid/Side Processing
No
7
RMS/Peak Detection Control
No
7.00
MIDI Learn
No
7
Average
8.10
Multiband compressors are a great tool to affect the dynamics and the overall frequency content of your mixes where a wide-band compressor just won’t do, and MB-Control makes this as simple as possible.
Most Cost-efficient Compressor (Harder Learning Curve)!
Price: Free or $44.
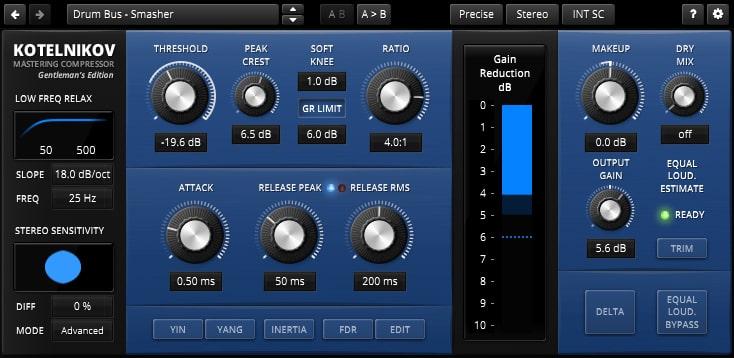
The Kotelnikov is a program-dependent compressor that doesn’t emulate any existing hardware compressors and rather focuses on fidelity, meaning that it can vary its response depending on the frequency content or amplitude of the signal.
Aside from the typical compressor controls such as Threshold, Ratio, Attack, and Release, it comes with individual controls for Release Peak and Release RMS, as well as a Gain Reduction Limit control, which essentially allows you to manually restrict the maximum gain reduction.
The GR Limit is useful when you find the perfect settings for most of the track but in very specific sections the compressor just clamps down on the signal too hard due to sudden volume changes, and this setting prevents it from over compressing the signal.
It also features a “Peak Crest” control which can go from “Peak” all the way to “RMS” detection, and this knob essentially allows you to control how the compressor reacts to peaks (quickly or by averaging the input level).
Another feature is the “Low Freq Relax” that lets you configure a high-pass filter for the sidechain, which makes the compressor react less to those lower frequencies such as kick and bass.
User Interface: The Kotelnikov has a ton of features packed into a compact interface, making it a bit harder to wrap your head around than other compressors at first.
Character: Kotelnikov focuses mainly on audio fidelity and not so much on adding color or character, which is why it’s considered by many to be one of the best mastering compressor plugins.
Uses: Kotelnikov is mainly designed for Bus Mixing or Mastering, but it can definitely be used to process individual tracks as well. Just remember that it’s not a coloring compressor (which is why it’s great for mastering all kinds of music).
Notable Features:
Low Frequency Relax (High Pass Filter on the Sidechain).
Ying and Yang controls add harmonics to the lower and higher frequencies respectively.
Inertia: Slower compression times with low Gain Reduction and vice versa.
Frequency Dependent Ratio (can be adjusted in depth).
Peak and RMS detection.
GR Limit (Limit the gain reduction).
Stereo, Mid/Side Processing.
Pros:
Versatile control over the final sound.
Useful for both mastering and mixing tasks.
Freemium (the free version is generally all you need).
Cons:
Some of the parameters might be harder to understand for beginners.
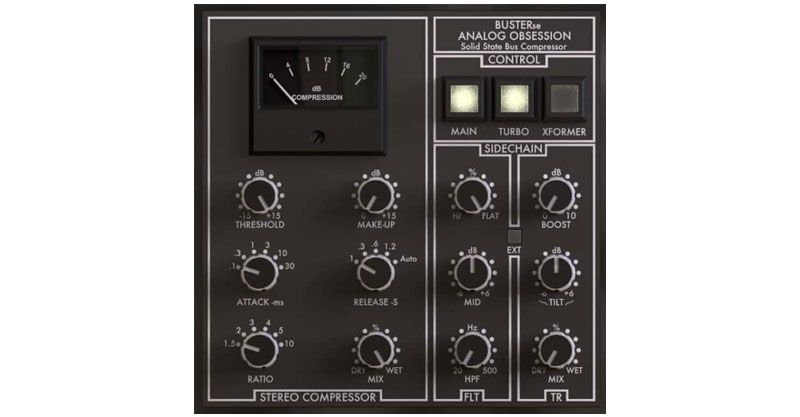
Analog Obsession’s BUSTERse stands out, particularly for enthusiasts of analog warmth and vintage compressor characteristics, since it’s designed to emulate the classic hardware sound of analog consoles.
While it does sport a fairly old-looking user interface, it’s very easy to use and understand, making it a great compressor for beginners and advanced producers alike.
A distinguishing feature of BUSTERse is its ability to add a distinct sonic imprint to the audio signal. This quality makes it especially suitable for applications that benefit from a touch of vintage coloration, such as vocal tracks, drums, or even on the mix bus.
The “SIDECHAIN” section offers filters to better control how the compressor reacts to incoming audio, and you can also enable the External Sidechain to let the compressor listen to another incoming signal while affecting the track it’s on.
In addition to this, it features the TURBO mode (makes the compressor listen to the whole signal range instead of focusing more on the mids) and the XFORMER mode (in/out ICs will be replaced to balance it. This will affect the impedance, character, overall sound) to give you some additional sound options.
Lastly, clicking on the logo will enable 4x oversampling.
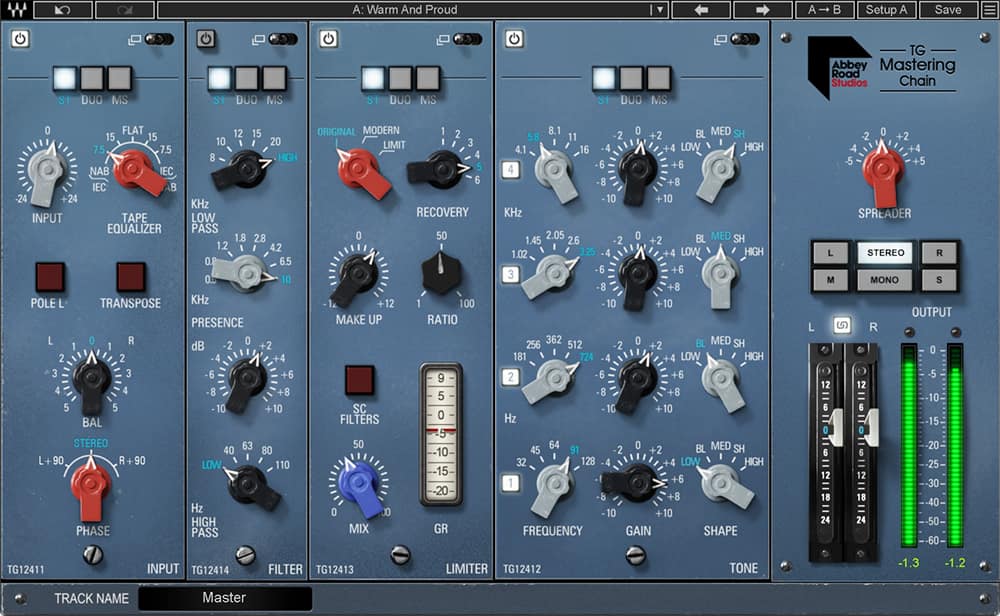
The Waves Abbey Road TG Mastering Compressor is a mastering plugin modeled after the EMI TG12410 Transfer Console, a staple in Abbey Road’s mastering studios since the 1990s.
This plugin comprises four modules and an output stage, each of which can be independently activated or deactivated, offering significant flexibility and allowing you to have more control over how much the plugin will load the CPU.
The modules include:
Input Module: Features input level control, L/R balance control, a transpose button, and phase controls. The highlight is the Tape Equalizer, originally intended for EQ adjustments between NAB and IEC standards, now offering unique EQ flavoring.
Tone Module: Provides a 4-band EQ with five preset frequencies for each band, suitable for a range of frequency adjustments.
Limiter Module: This one offers a total of three algorithms – Original, Modern, and Limit, with a Recovery switch for preset release times, and a Sidechain Filter feature for enhanced control over bass-heavy signals.
Filter Module: Includes High-Pass and Low-Pass filters with preset frequency selections, and a Presence filter for additional tonal shaping.
The Output section includes output gain controls and versatile metering options. A unique feature is the Spreader knob, which adjusts the stereo field width using MS processing.
Note: After testing and using the compressor for a while, I found the “Original” style to be the one I liked the most since it sounded great almost always, no matter how I set the other setting. The “Modern” style is also quite good, but I definitely prefer the original one most of the time.
Besides these modules, the plugin offers multiple operational modes (stereo, dual mono, and mid-side), and includes a live version with reduced latency for large mix sessions & live implementations.
As a bonus, it also comes with the Abbey Road TG Meter Bridge for additional metering capabilities.
Lastly, it’s compatible with AAX/AU/VST, and VST3 32-bit & 64-bit, formats and works on both Windows and Mac systems.
Pros:
Versatile control over the final sound.
User-friendly interface.
Useful for both mastering and mixing tasks.
Trial Version has no limit but cuts the signal every now and then.
Multiple processing options with a range of modules.
Cons:
Reported to have limited compatibility with certain DJ software.
High CPU usage (about 3 times higher than most other plugins).
Overall, the Waves Abbey Road TG Mastering Chain is a great tool for doing everything with a single plugin, especially since you have the option to rearrange the order of the effects chain, and it’s not only suitable for mastering but also effective on individual tracks and buses, making it a powerful tool for both mastering and mixing applications.
CPU Consumption & Scalability (Max Simultaneous tracks…)
112
4
Average
8
Criteria
Value
Score
Installation, DRM and Licensing Restrictions
Waves Installer
8
Free Trial Availability
Forever but with sound cuts
8
Interface Look and Feel, Intuitiveness, Responsiveness
Very responsive and intuitive
10
Ease of Use
Beginner friendly
9
Documentation and Learning Resources
Written Guides & Videos
10
Update and Support Policy
Lifetime Updates (With Subscription)
9
Average
9.00
Criteria
Value
Score
Sound Fidelity, Sound Options
Transparent sound
10
Artifacts/Distortion
No Artifacts or Distortion
10
Average
10
Criteria
Value
Score
Price
$49.99
Min Price of Similar Plugins
$29.99
Max Price of Similar Plugins
$199.00
Average
8.93
Criteria
Value
Score
Formats
VST, VST3, AU, AAX, 32-bit & 64-bit
10
Compatibility
Windows, MacOS, Linux
10
Average
10
Criteria
Value
Score
Auto Makeup Gain
No
7
Auto Attack & Release
No
7
Mid/Side Processing
Yes
10
RMS/Peak Detection Control
No
7.00
MIDI Learn
No
7
Average
7.60
Note: Technical performance score is 8 because I was only able to load the plugin on ⅓ of the tracks that MB-Control and the BUSTERse were able to handle before hearing cracks and pops.
Get the Waves Abbey Road TG Mastering Chain here:Waves Website.
The Softube Weiss Compressor/Limiter is a digital compressor and limiter designed for mastering, offering features adapted from the Weiss DS1-MK3.
The interface combines a straightforward main panel with additional detailed controls in side-menus, catering to both quick adjustments and in-depth parameter tweaking.
The plugin’s visual design includes high-resolution waveforms and gain reduction readouts in the form of histograms, which can be helpful in observing the effects of processing on the audio signal in more detail than with traditional VU/Gain Reduction meters.
Expert Settings View.
If you need a more in-depth view of the controls, you can open the Expert Parameters section to adjust the release time in an extremely detailed manner (RMS, Auto Release, Average, and more), you can also enable/disable the auto makeup, and more.
The Weiss Compressor/Limiter focuses on transparency in processing without adding any sort of coloration, making it a great compressor/limiter for mastering and allowing for detailed control over dynamics while maintaining the original character of the track.
It includes features such as low pass and band pass filters for targeted compression, Mid/Side processing, parallel compression, and introduces two new limiter algorithms.
The one big drawback about this compressor, or any Softube plugin for that matter, is the Activation/Licensing process: You need to create a Softube and an iLok account, download the Softube installer, download the iLok license manager, install the plugin and activate it there (in my case, the Softube installer even forced me to download some additional things).
People often think that the plugins that come with the DAW are lower quality than any of the more “premium” offers, and I think that this is especially the case with compressors and limiters.
The compressor that comes stock with your DAW is more than capable of yielding great results if you know how to use it properly.
In some cases, the built-in features may not be as advanced, but if you take the time to dial in the settings correctly, the end result should sound almost identical and you don’t need to spend your extra cash on external plugins.
Summary
MB-Control and TDR Kotelnikov are probably the two compressors you should give a try: MB-Control is a multiband compressor, which means that you have finer control over the dynamics of the entire mix, and Kotelnikov is one of the best bang-for-your-buck wide-band compressors out there, and the free version comes with plenty of useful features.
In this article, I will be reviewing the best multiband compressors currently available.
This list will comprise the 5 absolute best plugins for every need and budget, since their price ranges from only $29 to a whopping $199.
I will be reviewing these plugins and running them through a series of tests, such as loading as many instances of the plugin as possible before artifacts appear during playback, and more.
Here’s a brief description of the testing process:
Technical performance: Tested with Pluginval and Auval, loading as many instances of the plugins as possible before audio playback is affected, testing oversampling, aliasing, latency, and more factors.
User experience: From installation to actually using the plugin.
Sound quality: Self explanatory.
Economic Factors: Taking the average price of roughly 20 plugins of the same type and comparing it to the price of the plugin.
Compatibility & Plugin formats.
Plugin-specific Features: In this case, if they have auto makeup, auto attack and release, etc.
Note: I tried a lot more multiband compressors than the one found on this list, but these are the ones I found to be more suitable for most people, be it because of their price-to-performance, or just overall feature set.
Released at the end of November 2023, the THR MB-Control is a very new addition to the plugin market and is designed to make multiband compression as simple and intuitive as possible.
It offers three distinct bands which can be manipulated independently to adjust the way your tracks, buses, or entire mixes sound.
To make things simple, you have access to a handful of ratio, attack, and release values, as well as the option to enable the auto-attack and auto-release functionality, and if you really want your compressor to groove with the music, you can choose to enable the release-sync feature which synchronizes the MB-Controls’ release time to the project’s BPM.
One of the stand out features of MB-Control is its Automatic Gain Makeup functionality: Proper auto makeup gain is quite hard to implement even in regular full-band compressors, not to mention on multiband compressors, but MB-Control does offer this feature which lets you focus on hearing how the compressor is affecting the signal without getting influenced by volume changes.
In addition to this, a saturation module for each band can also be used to add brightness and personality to the sound, and all of this without affecting the output level.
MB-Control also offers sidechaining compatibility, which allows for advanced compression techniques, such as ducking and pumping effects, as well as 4x and 8x oversampling to reduce aliasing and improve audio quality.
Multiband X6 tries to make multiband compression simple while still providing you with a ton of functionality by having global parameters that affect all bands simultaneously: The threshold knob will set the threshold for all bands, for example, but this also works for the ratio, attack, and release.
The “Compression” knob adjusts the ratio and lets you choose the maximum level of compression, which means that it will never compress the signal more than that, making the whole process more forgiving.
It’s worth mentioning that Multiband 6X still offers in-depth control for every single band, the global parameters are only there to make things simpler.
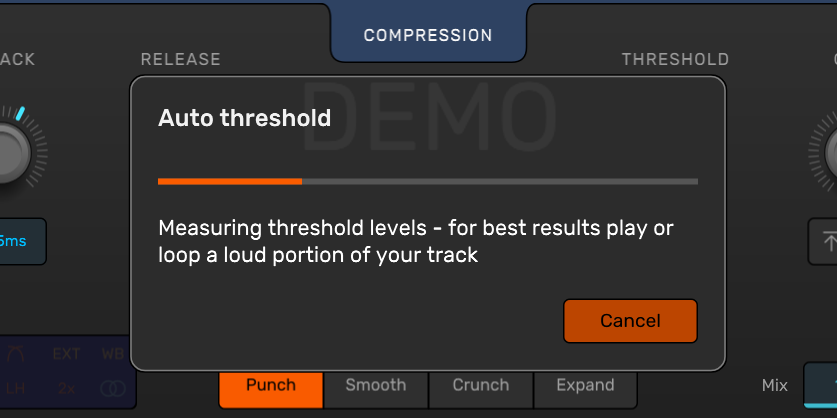
In addition to this, it features an “Auto-Threshold” that analyzes the tracks’ average level and sets each band’s threshold accordingly (this is not dynamic: It analyzes the tracks, sets the threshold and it doesn’t change from there).
A really nice auto-gain is also available that can be toggled from “Full-band” to “Individual-Band”, and it’s one of the better auto-makeup features I’ve seen so far on multiband compressors.
Multiband X6 features three compressor styles (Punch, Smooth, and Crunch), and it also doubles as an expander.
Lastly, Multiband X6 has an advanced tap that can be sued to enable sidechain processing, multiband or wideband functionality, linear phase, lookahead, Mid/Side processing, and oversampling.
Notable Features:
Mid/Side processing.
Sidechain.
Oversampling.
Lookahead.
Input/Output Level Match.
Pros:
14-Day Free trial (with white noise).
Global Parameters and auto threshold.
3 compressor styles and expander.
Very Visual.
Cons:
Harder to understand than some other multiband compressors (MB-Control or G3 MultiBusComp).
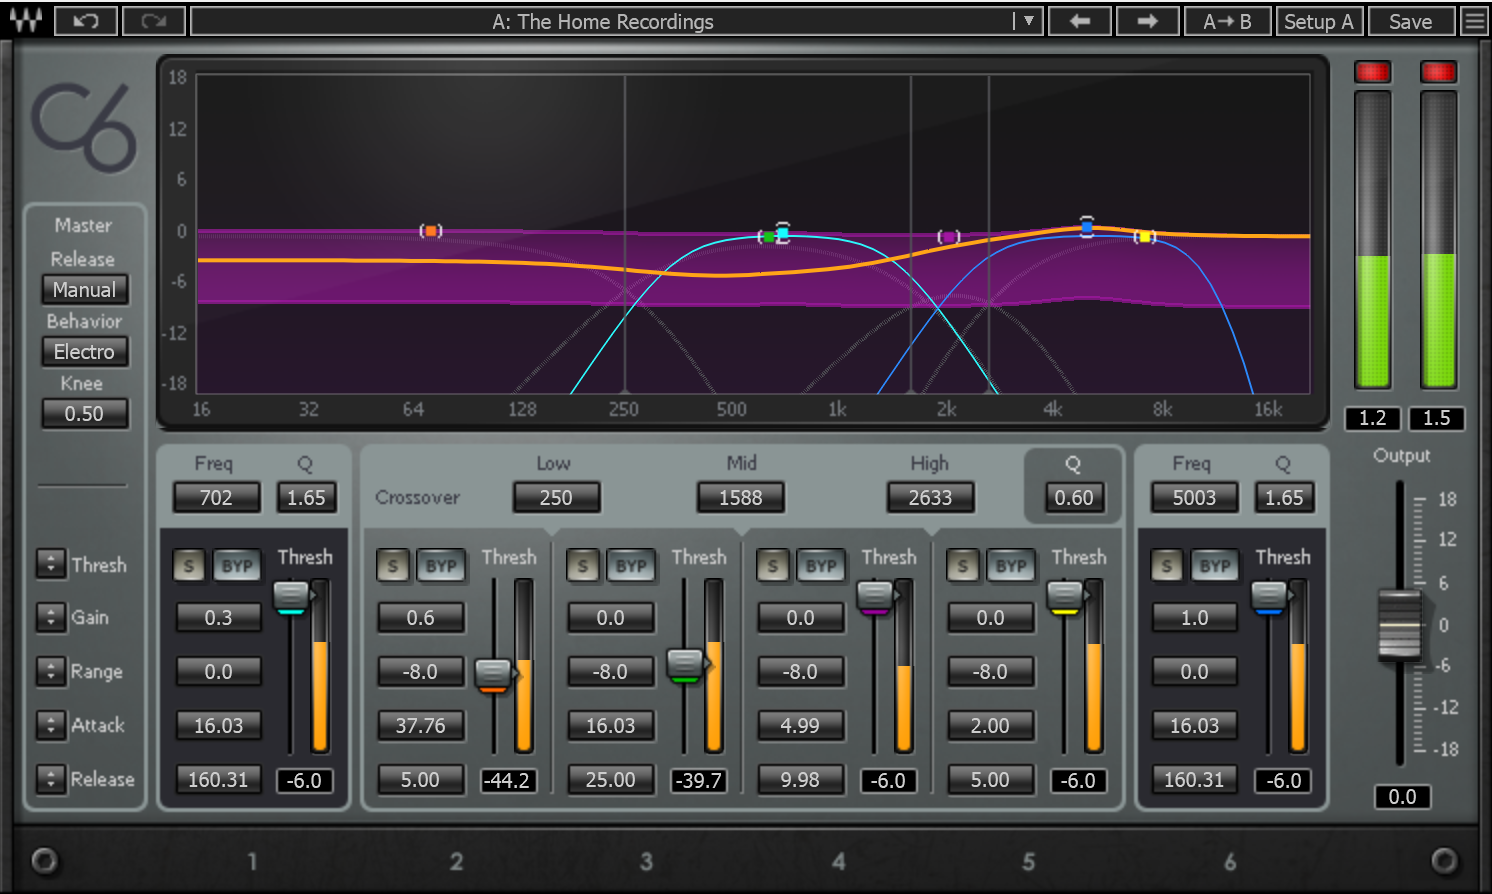
The Waves C6 is a classic in every sense of the word: It’s been used on countless records by industry leading producers, and it’s also extremely old, as evidenced by its dated interface.
While it doesn’t provide as good of a workflow as any of the other plugins on this list, it only comes in at $29.99, and the processing/sound quality side of things is excellent.
It features a total of 6 bands with the typical threshold, ratio, attack, and release, as well as master controls for all of those parameters as well.
Lastly, you can control the output level via the master Gain knob, the Gain on each band or via the Master Output (I thought the Gain would behave as an Input control, but it doesn’t, the compressor doesn’t react differently to those changes, so it’s basically an output control that affects each band slightly differently).
I don’t think Fabfilter requires an introduction since it’s the company behind some of, or maybe most of the industry leading plugins.
The Pro-MB multiband compressor lets you add up to six bands, all with individual parameter control, and it also doubles as an expander.
Aside from the typical compressor parameters, such as threshold, ratio, attack, release, and knee, it also features a “Range” slider that controls the maximum gain reduction or “expansion”: If you want a maximum of 5dB of gain reduction at any point, set the range to -5dB and Pro-MB will never compress the signal more than that.
If you prefer a more traditional style of workflow, you can link the bands together for a simpler more “traditional” way of using a compressor.
Lastly, it features a couple of additional settings to fine-tune the processing, such as “Aggressive compression”, “Aggressive Expander”, and more.
Notable Features:
Lookahead.
Sidechain.
2x and 4x oversampling.
Choose between Minimum Phase, Dynamic Phase, and Linear Phase.
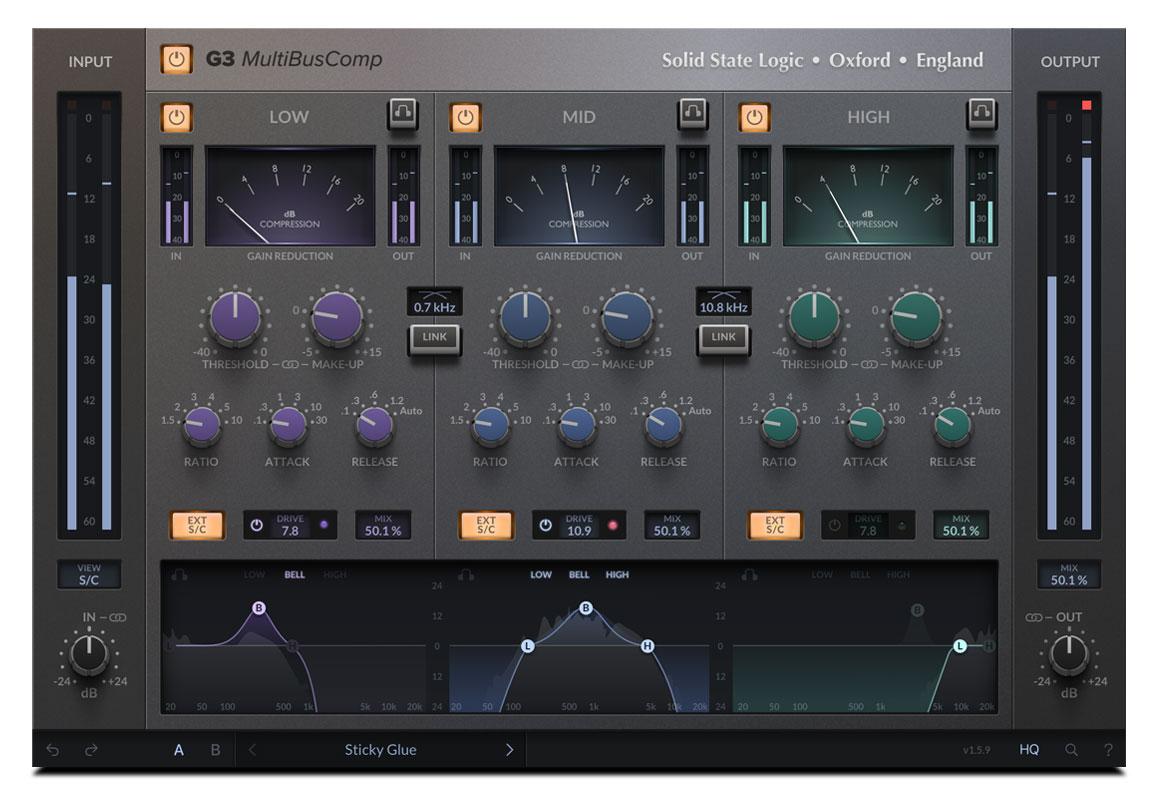
Another new addition to the plugin world is the SSL G3 MultiBusComp, a 3-band multiband compressor marketed as being a “glue compressor”, which means that its main purpose is to be used for bus compression and mastering, hence the name.
In typical SSL fashion, the interface looks sleek, clean, and it’s a very simple and intuitive plugin to get your head around, contrary to a lot of other multiband compressors.
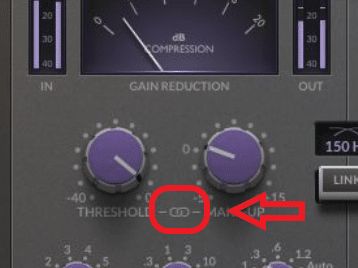
One thing I noticed when working with this plugin was its threshold & gain linking feature, which sounds like an auto-makeup feature, but isn’t: Essentially, you can link the two sliders together and lowering the threshold by 1dB increases the gain by 1dB.
This approach, however, does not keep the output level the same, so I never found myself using it.
Each band comes with a saturation module (very slight saturation) which doesn’t affect the output level when turning the drive up, making it extremely easy to use.
In addition to this, the MultiBusComp offers Oversampling, which can be turned on via the “BQ” button, as well as sidechain capabilities.
One complaint I have, however, has to do with the installation process: You need to register on their website, download the SSL Installer, download the plugin via the installer, then download the iLok License manager, and lastly, activate the plugin.
If your trial runs out and you open a project where the plugin should be getting loaded, at least in Reaper and Studio One, it gets stuck in a loop trying to activate and you need to cancel the activation multiple times before it opens the project.
Notable Features:
Sidechain.
Oversampling.
Saturation.
Pros:
Excellent sound quality (Great for bus compression).
Very easy to use and understand.
Cons:
No proper volume compensation.
High price.
Requires SSL Installer and iLok license manager (not the best user experience).
Note: The reason the user experience score isn’t higher is because of the Plugin installation, activation, and licensing steps described above, which is as bad of an experience as it gets when installing plugins.
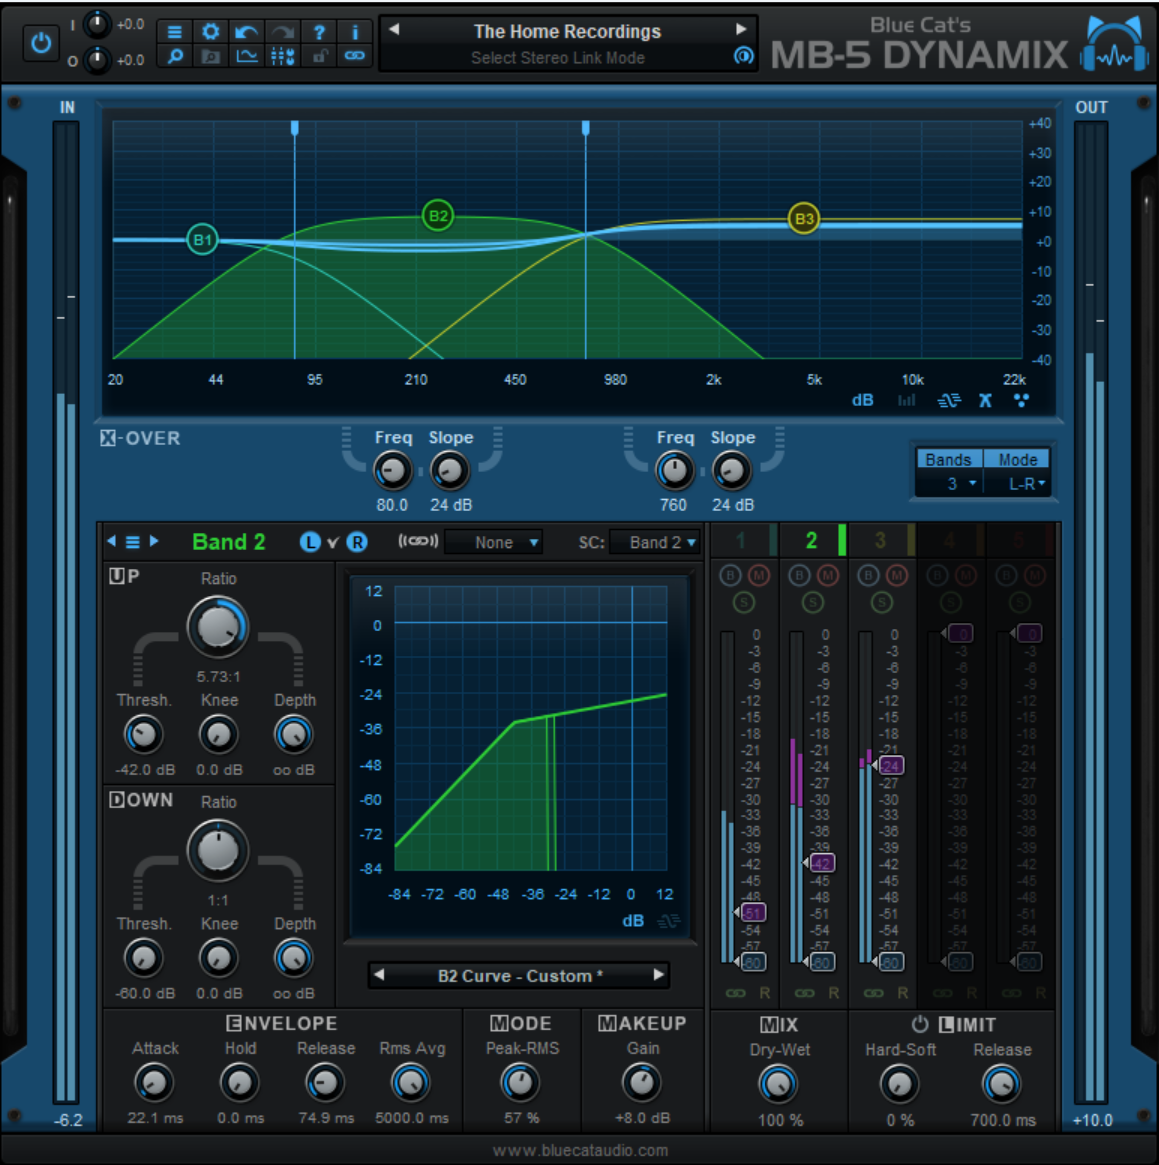
BlueCat MB-5 Dynamix
5-band compressor & expander
Price: $149.
The MB-5 Dynamix by BlueCat has been around for quite some time now, but despite its age, it’s still a fairly powerful and usable plugin.
MB-5, as the name implies, gives you the ability to enable up to 5 bands (3 enabled by default) and these can be tweaked individually, be it to add compression or expansion.
The detection mode can be RMS or Peak, and you can control the RMS detection time manually as well.
Lastly, it features a Limiter section, as well as L/R and M/S processing, and even “hold release” functionality (this lets you set a time limit in milliseconds where the compressor holds the compression before releasing).
As far as the interface goes, it’s quite dated-looking and the controls don’t feel that smooth (small mouse movements adjust the parameters a bit too much), and it’s also not the most intuitive multiband compressor out there (the MB-Control or the SSL G3, for example, are much more intuitive).
Notable Features:
RMS & Peak Detection.
Built-in Limiting.
Hold Release functionality.
Adjustable Slopes.
Pros:
Free version (stops processing for a couple of seconds every now and then).
Clean Sound.
L/R and M/S processing.
Cons:
No Auto Makeup.
Unintuitive design.
Plugin seems to always be “in front”, meaning that pressing the spacebar wont start and stop the song unless you click somewhere on the DAW first.
MB-Controlis a great multiband compressor for large projects since it’s the one that uses the least amount of resources on this entire list, it’s also extremely easy to use and at $49.99, it’s a great choice.
Multiband X6 would be my next choice, since it comes in at roughly $90 and includes a ton of advanced features.
Auto-tuning vocals is an important aspect of music production, and FL Studio offers a variety of plugins to help with this. In this article, we will be discussing the two stock plugins included in FL Studio for vocal tuning: NewTone and Pitcher.
I will go over the similarities and differences between the two plugins, as well as their specific controls and features. I will also provide a guide on how to use these plugins for pitch correction and achieving the desired sound.
Let’s get started!
Included FL Studio Plugins that allow us to AutoTune vocals
The two stock plugins that allow for vocal tuning are NewTone and Pitcher:
NewTone is very similar to Melodyne and is meant for pitch correction, allowing you to edit notes in a piano roll, tuning each syllable to your desired pitch, and basically offers in-depth control over every single sound.
Pitcher acts more like your standard live autotune since it can correct vocals as they are coming in, but it can also be used on already-recorded tracks. It’s also worth noting that Pitcher is generally used more as an effect, similar to Auto-Tune (think Charlie Puth, I’m Blue by Eiffel 65, etc.).
Note: There are plenty of free pitch-correction and Auto-Tune plugins out there that you can also get and I will be mentioning some of them down below and linking to a post I wrote about the best ones.
Now, let’s get into the actual guide on how to use both NewTone and Pitcher:
How to Pitch-Correct with NewTone
To get started, you first need to load a new instance of NewTone, and there are two ways of going about it:
To load a new instance of NewTone go to your Mixer (F9), click on any insert slot of a track and load NewTone. Now you can drag any audio file you want into it.
Another way of opening NewTone is by double-clicking on any audio file on the playlist and then right-clicking on the waveform and selecting “Edit in Pitch Corrector”.
Let’s quickly go over the different controls that NewTone has to offer since it’s important to familiarize yourself with them in order to understand the plugin’s workflow:
Understanding NewTone’s interface
Waveforms: Once you open up the audio file in NewTone you will see the different notes broken up into distinct sections displayed on top of a piano roll, usually, each word shows up as a separate waveform, that shows you exactly the pitch of the notes and it’s quite easy to see if they are in tune or out of tune. These are represented as Lightgrey waveforms.
Orange Line: The squiggly orange line going through the waveforms represents the exact pitch throughout each note and how the pitch moves from one word to the next.
Orange Horizontal Lines: These lines show you where the center of the pitch is and the orange rectangle shows where the pitch actually “should” be, making it easy to see how in- or out of tune that specific vocal part is.
NewTone Controls
While you could certainly do everything manually, and generally you should, NewTone allows you to control general parameters with three knobs to pitch-correct the entire audio file quickly. These are “Center“, “Variation“, and “Trans“. Let’s take a quick look at each of them:
Center: Adjusts how on-grid, or how “in pitch”, the notes are. Turning it all the way to the left leaves the file exactly as it was recorded, turning it to the right makes it as “in pitch” as possible.
Variation: This knob controls how much variation there is in the pitch within each of the recorded notes, or words. This is represented by the squiggly orange line I previously mentioned. Generally speaking, this affects the “vibrato of a note”: Turning it all the way to the left makes it sound extremely flat without any vibrato, and turning it to the right adds even more vibrato to the original performance.
Trans: This adjusts the transition time between each note. All the way to the right makes the transitions almost instant which results in a robotic sound.
Advanced Editing Mode
The advanced Editing mode can be accessed in two different ways:
Double-click on any note in NewTone.
Click on the icon that looks like the upper half of a cogwheel.
Enabling the advanced editing mode opens up a whole new set of controls that you can use to adjust every specific note (very in-depth).
Different advanced editing controls.
You can click on any of the sections shown in the image above and drag them up or down to control specific parameters:
Fade in Gain: Controls the volume at the start of the note.
Ramp In: Controls the pitch at the beginning of the note.
Variation: Controls the pitch variation between the ramp in and ramp out sections.
Volume: Controls the volume between the Fade in Gain and Fade out Gain Sections.
Fade out Gain: Controls the volume at the end of the note.
Ramp Out: Controls the pitch at the end of the note.
Advanced Formant Shift: Controls how masculine or feminine the audio sounds.
Advanced Vibrato Editing
Advanced Vibrato Editing Mode.
In addition to the controls I just mentioned, you have access to the “Advanced Edit Vibrato” mode by clicking on the Edit Tool’s dropdown menu which basically gives you a bit more in-depth control over the vibrato than the variation tool.
Recommendations when using NewTone
Here are some of the things I would recommend doing every time you reach for NewTone (especially if you’re just learning how to use it):
Select a Scale
I would highly advise selecting a scale so that NewTone properly understands what notes it should be correcting to. This is done by clicking on the dropdown menu of the edit tool (Small Scissors), going to “Scale” and then selecting the right one.
Selecting the right scale makes the use of the general controls (Center, Variation, and Trans) more effective.
Start with the Basics
Start out by adjusting the basic three controls that NewTone offers, Center, Variation, and Trans, and see what results you get.
The importance of doing this is that you may end up investing too much time into adjusting every little detail without realizing that maybe the track now sounds great on its own, but no longer fits right in the mix.
Cut the notes multiple times
Use the “Cut” tool cut up the different notes into multiple parts. You may notice that the different parts you cut now move to a slightly different part of the grid, but this won’t affect the sound.
The whole point of doing this is that you get more granular control over that specific note since you can adjust the ramp in and ramp out, Fade in Gain and Fade out Gain, variation, vibrato, etc. for every single part.
This, however, is more advanced and may take up a lot of your time, but the results are generally better.
Dragging the Audio File back into the Playlist
Once you have the audio sounding the way you want it to, simply click on the “Drag Selection” button and drag the file back into the playlist.
Of course, you could also save/export the file by clicking on the save icon.
Create a MIDI Score with NewTone
With NewTone, you can convert audio into MIDI, allowing you to use the composition of your audio file in other instruments. This is especially useful when trying to figure out the key of a sample, or even which bass notes you want to play. You can do this by clicking the MIDI score button (see image below).
Creating MIDI Score in NewTone.
This will input the MIDI information into your sampler in the channel rack, and it will copy the MIDI data to your clipboard as well.
To input the MIDI data directly to a specific instrument or sound, select the desired sound in the channel rack, there will be a green box indicating that you’ve selected something. Then click the MIDI score button, and your data will be sent directly to your instrument from NewTone.
How to AutoTune with Pitcher
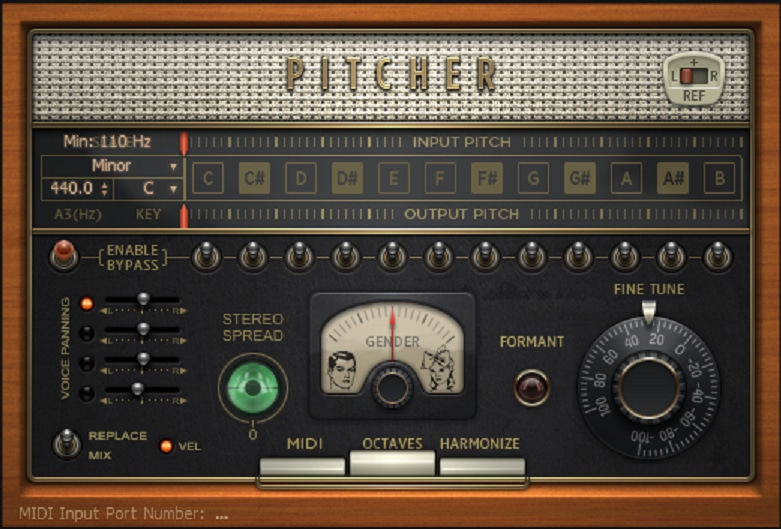
Pitcher is a real-time pitch-correction, manipulation & harmonization plugin that can be used to correct and harmonize notes via MIDI control.
It’s worth noting that Pitcher is mainly intended to be used as an Effect, similar to Auto-Tune, and not so much more in-depth and subtle pitch correction.
There are four primary modes for which you can use this plugin:
MIDI: When enabled, makes the pitch react to the notes being sent to Pitcher via MIDI.
Automatic mode is automatically enabled when MIDI mode is disabled and Pitcher will do all the work for you.
Octave: Similar to MIDI but can add a second octave if it’s found in the MIDI file.
Harmonizing mode allows you to input MIDI and Pitcher will correct the incoming signal to the key you’re pressing.
How to use Pitcher
Open the Mixer (F9) and load an instance of Pitcher into the required track.
Set the corresponding scale (Major, Miner, Pentatonic, All) and then select the Key of the scale. This will tell Pitcher what notes it should snap to.
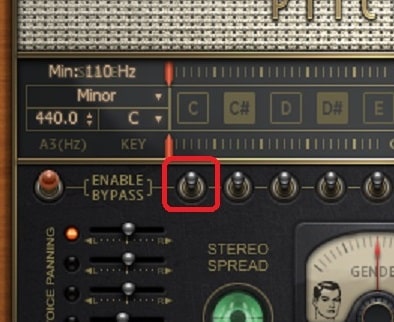
Note: If there’s a note in the scale that Pitcher should not be reacting to, then click on the little switch below that note to disable it.
Disable specific Note.
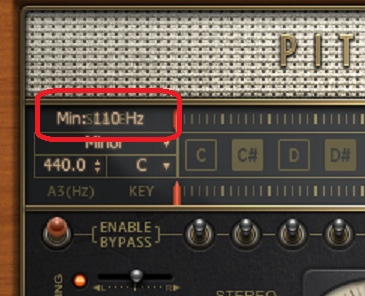
Recommendation: Where it says “Min: 110Hz“, you can use this section to allow Pitcher to work better when tuning male or female vocals: Use 80Hz and below for male vocals, and 110Hz and up for female vocals.
Use the Speed and Fine Tune Controls to determine how fast Pitcher snaps to a note also to slightly shift the pitch up or down.
Use the Formant Shift control to adjust how “Masculine” or “Femenine” the audio sounds.
If you have created a piano roll with the MIDI notes that you want to use to pitch the Audio, click on MIDI in Pitcher, select the corresponding port, and then use the MIDI Out plugin to feed those notes to Pitcher.
Use Pitcher to create Harmonies
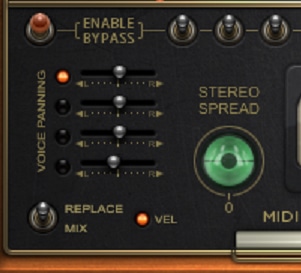
As I previously mentioned, Pitcher comes with the Harmonizing mode which feeds off of the Notes of a Piano roll to both pitch the vocals and also add up to three additional harmonies (4 in total).
Click the harmonize button and the MIDIbutton to enable this mode.
When enabling the Harmonize Mode, you get control over the panning of each voice
Octave Mode
Similar to the Harmonize Mode, Pitcher can use the MIDI information from a Piano roll to add an octave to one of the notes. The way it works is by detecting if there’s an additional MIDI note in the Piano roll: If there is, Pitcher will play that note, if there isn’t it will only reproduce the original note.
When to use NewTone or Pitcher
If you are looking to edit notes in a piano roll and have in-depth control over every single sound, then NewTone is the plugin for you. It is similar to Melodyne and is meant for pitch correction, allowing you to fine-tune each syllable to your desired pitch.
If you are looking for live autotune, or an effect similar to Auto-Tune, then Pitcher is the plugin for you. It can correct vocals as they are coming in, but it can also be used on already-recorded tracks. Pitcher is generally used more as an effect, similar to Auto-Tune.
It’s worth noting that there are plenty of free pitch-correction and Auto-Tune plugins available that you can use in place of NewTone and Pitcher. It’s important to familiarize yourself with the interface and controls of the plugin you choose in order to understand its workflow and achieve the desired result.
Other Alternatives
There are multiple Pitch-correction and Auto-Tune-style plugins out there, both Free and Paid, that you can use.
If you already own a version of FL Studio that comes with Pitcher and NewTone included, then I wouldn’t recommend using anything different unless you’re willing to fork out some cash, since these built-in tools are much better than any of the free alternatives.
However, if you can only use both of these plugins in their trial version, then you should absolutely download some of the free ones.
Investing in Melodyne and Auto-Tune is always worth it if you re a dedicated music producer (especially Auto-Tune since it is much more powerful than Pitcher).
Of the Free ones, I would recommend Graillon2 and MAutoPitch since they are powerful and easy to use.
The paid Alternatives would mainly be Auto-Tune and Melodyne, here’s where you can get them:
So, wrapping up, I would suggest using NewTone for in-depth vocal pitch-correction, especially when you want it to go unnoticed, and use Pitcher as an effect (similar to how artists like Charlie Puth, etc. use it).
I hope this information was useful!
Have a great day!
FL Studio is a digital audio workstation (DAW) that is popular among music producers and audio engineers for its ease of use and intuitive design. It offers a wide range of features and tools for creating and editing music, including a comprehensive selection of virtual instruments, effects, and loops. One of the strengths of FL Studio is its user-friendly interface, which allows users to easily navigate and find the features they need.
However, one area where FL Studio can be somewhat unintuitive is in the process of copying and pasting settings, plugins, patterns, and other elements within the software. While FL Studio does offer various options for copying and pasting elements within a project, the specific method can vary depending on the element you are working with.
In this article, I will go over the various ways you can copy and paste settings, patterns, piano roll notes, etc., in a very clear and concise way to make it as simple for you to understand as possible!
So, without any further ado, let’s get started with the one method I use the most!
Copy Plugins to a different track and keep the settings
Most DAWs allow you to simply drag and drop a plugin from one track to another by shit+clicking or ctrl+clicking on it, but that’s not the case with FL Studio and, in fact, they make it a tiny bit less intuitive, but it still can be done.
Here are the steps you need to follow:
Select the track that has the plugin you want to copy by clicking on it.
Click on the small arrow beside the plugin.
Where it says “Save Preset as”, left-click on it and drag it to the track you want.
This will copy the entire plugin and keep all of the settings on that plugin as well.
Copy and Paste Mixer Presets/States in FL Studio
Copying and pasting entire Mixer states (basically, all of the settings and plugins on a mixer track to another) can speed up your music production and mixing process, and it’s really easy to do.
Here are the steps you need to follow:
Select the track that you want to copy its state from by clicking on it.
Right-click on it and go to “File”>”Save Mixer Track State as…”, then click and drag it to the new track.
Important: It’s worth noting that this method will copy absolutely everything from one mixer track to the other, even the name, color, routing, etc.
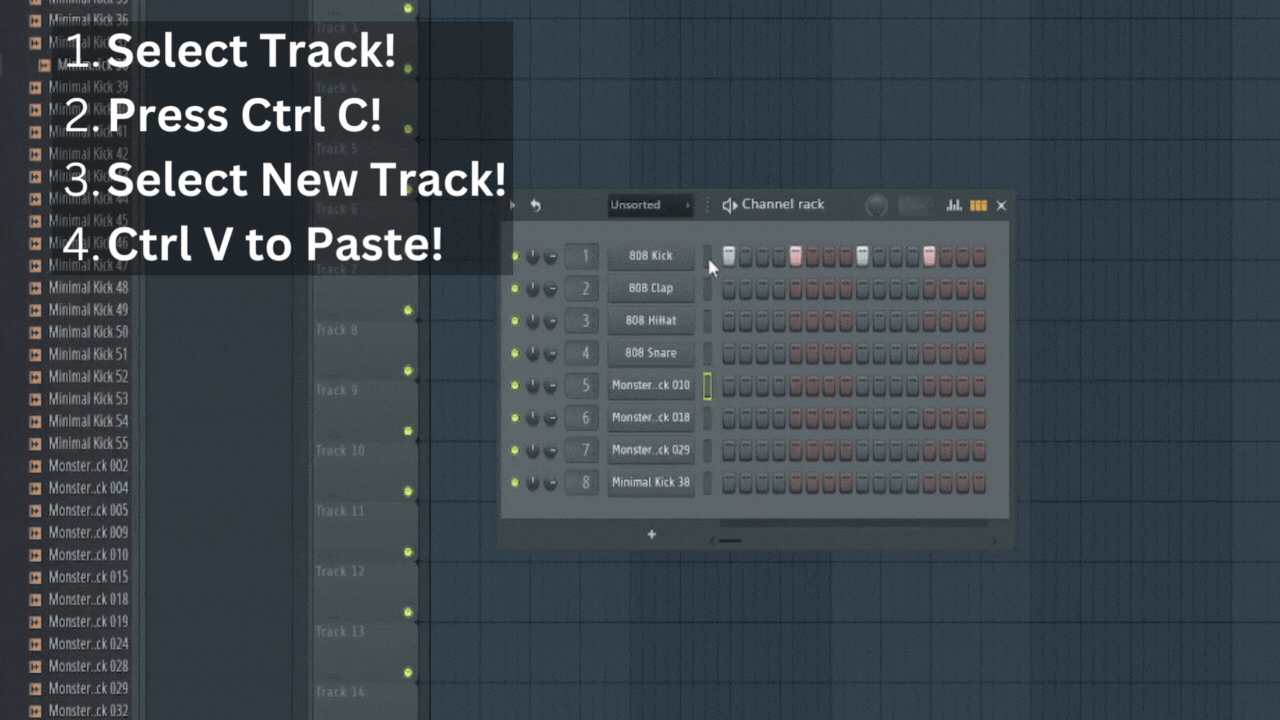
Copy and Paste Channel Rack Patterns
Copying entire channel rack patterns is probably one of the most useful ways of streamlining your workflow since you may want to have a snare and some claps following the exact same pattern, and copying and pasting makes this extremely fast.
Here are the steps you need to follow:
Select the track you want to copy the pattern from by clicking on the small rectangle.
On Windows, press Ctrl+C to copy (Command+C on Mac).
Select the track you want to copy the pattern to and press Ctrl+V on Windows or Command+V on Mac.
To copy multiple patterns at the same time, select multiple tracks, Press Ctrl+C/Cmd+V.
To paste multiple patterns simply click on the track you want to copy the patterns to, press Ctrl+V or Cmd+V and FL Studio will paste them in order onto the next available tracks.
Copy and Paste notes on the Piano Roll
Copying and pasting notes on the piano roll is absolutely essential, be it in the same pattern itself, or by copying all of the notes over to a different channel to create different sounds using another instrument.
Here’s how to do it:
Copy the entire track to another one on the Channel Rack
This is done the exact same way as coping the channel rack patterns.
Here are the steps you need to follow:
Select the track by clicking on the little rectangle.
Press Ctrl+C or Cmd+C to copy.
Select the track you want to copy the notes to.
Press Ctrl+V or Cmd+V to paste.
Copy notes from the Piano Roll
You can copy notes inside the piano roll to paste it into the same one or to copy to a different instrument, and both are done the exact same way.
Here are the steps you need to follow:
Select the track you wish to copy the MIDI notes from and open the Piano Foll (F7).
Using the Selection tool select all of the notes you with to copy and press Control+C or Cmd+C.
Press Control+V or Cmd+V to paste the notes either onto the same piano roll or onto a different one.
Summary
In order to copy and paste things in FL Studio, you can generally rely on the typical Control+C and +V commands, at least in most situations.
However, copying mixer presets as well as plugins is not as intuitive and going to the “Save as” section in the menu will allow you to drag-and-drop that plugin/mixer state onto another track.
I hope this information was useful!
Have a great day!
So, you just opened up FL Studio and decided to create a song or a beat only to find that there are some strange popping and crackling noises coming out of your speakers, but is it really the speakers or is it actually something going on in FL Studio?
Luckily, you don’t need to throw out your speakers since it’s most definitely a configuration issue in FL Studio’s audio settings.
So, in this article, I will be going over what causes the crackling noise and how to solve it.
Let’s get started!
Why the Audio is Clackling in FL Studio
The most common culprit for crackling audio is if the buffer size (the number of samples it takes for your computer to process any incoming audio signal) is too small since this puts more strain on the computer and when it can’t process all of the audio in the required timeframe, the crackling noise appears.
Now, why not simply use the largest buffer size and be done with it?
Well, increasing the buffer size introduces latency, and recording when there’s a lot of latency present in the system is nearly impossible and quite annoying to have to deal with.
This is why you should try to use the smallest buffer size possible, as long as there is no crackling noise present.
You may also notice that the more processing you start adding to a project (more tracks, effects, plugins in general), the more that crackling appears, and this is also true when running any additional software on your PC, such as a screen recording software, since these take away resources that may otherwise be used to process the audio faster.
How Sample Rate affects this
The sample rate represents how many samples there are per second (Frequency represented in Hertz) and latency is calculated as follows:
Buffer Size/Sample Rate = Latency.
Now, you may have noticed that the higher the sample rate, the lower the latency, sounds counterintuitive, right? But this is the case.
However, let’s compare using sample rates of 48kHz and 96kHz. Although you might get about half the latency when using a 96kHz sample rate, this means that your computer will also have to process a lot more data in the same timeframe which, if the audio starts crackling, may force you to increase the buffer size which, in turn, introduces more latency.
How to Solve this issue in FL Studio (Change Buffer size and Sample Rate)
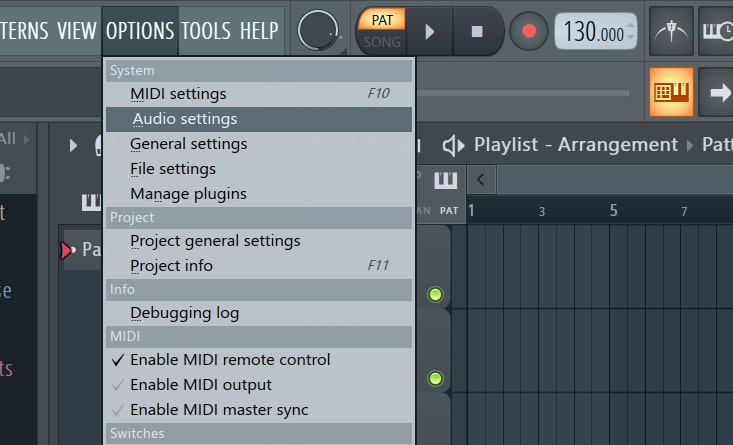
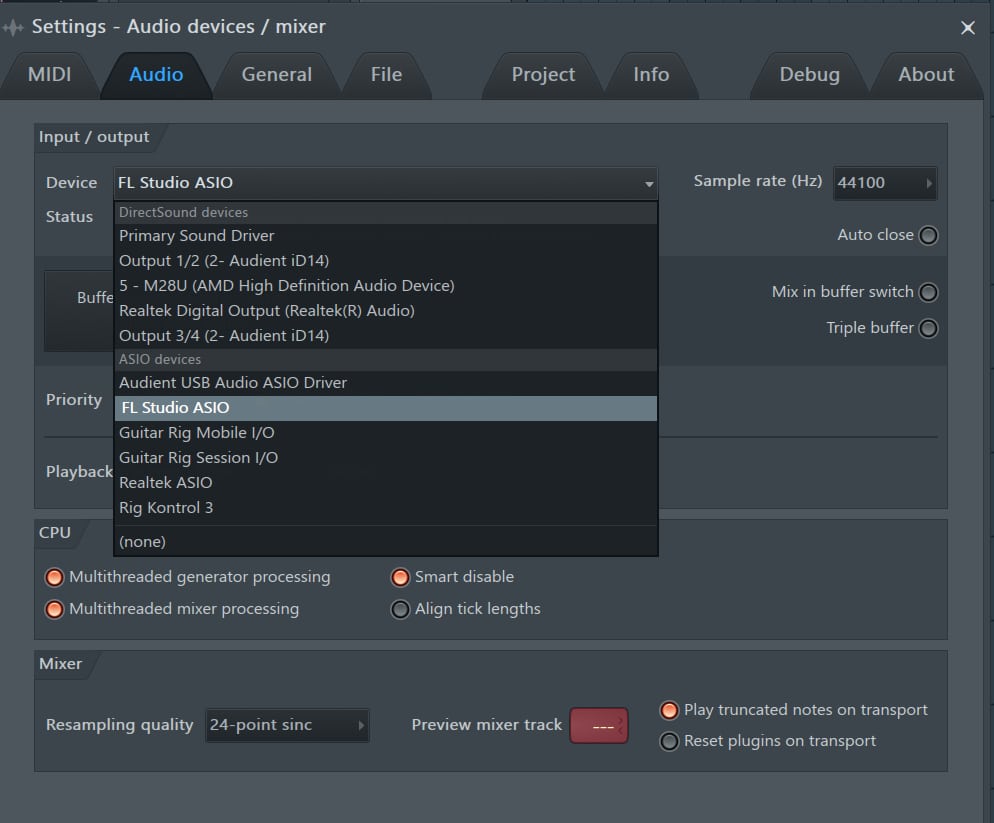
All you need to do is go to FL Studio’s audio settings and adjust the sample rate and buffer size.
Here’s how to do it step-by-step.
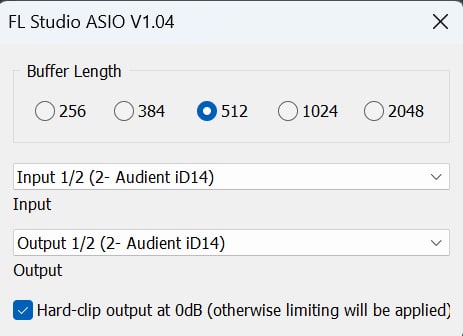
Go to Options>Audio Settings.
Click on the “Device” Drop down menu and select the audio driver (generally the one specific to your audio interface but FL Studio ASIO works well).
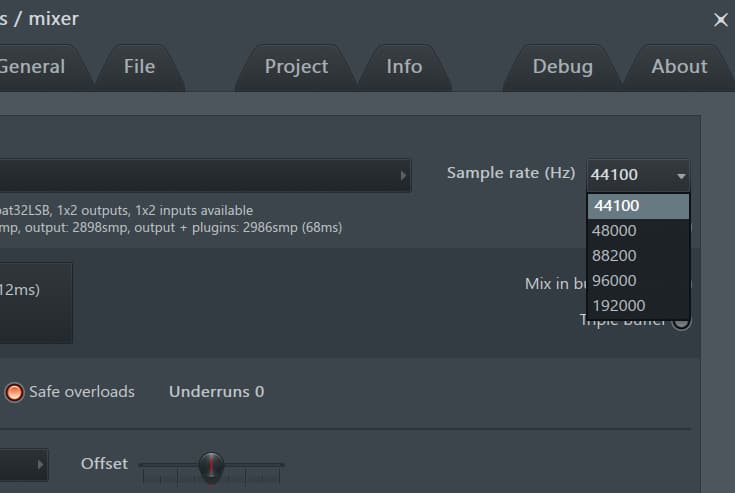
Click on the “Sample Rate (Hz)” Drop Down menu and choose the lowest one (introduces slightly more latency but isn’t as hard on CPU).
Click on the “Show ASIO Panel” to adjust the buffer size and select the lowest setting (the lower the buffer the higher the risk of audio crackling).
Test to see the results. If there’s crackling, go back to the buffer settings and select a larger one. Keep on increasing it until the crackling is gone.
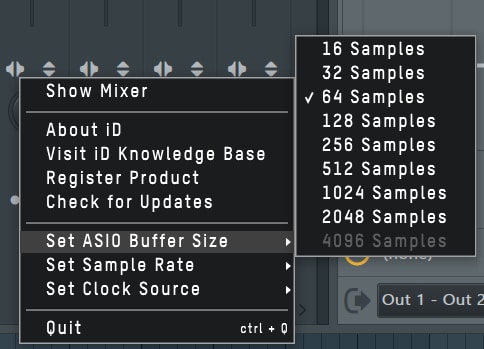
Note: Depending on the audio driver you’re using, you may need to adjust the buffer settings in the OS’ audio settings or by clicking on the Audio Driver’s icon on the taskbar (this happens with my Audient Interface).
Changing buffer size from Audient audio settings.
Other causes
There may be other causes for this issue, not just buffer size, such as plugins not working like they’re supposed to, or plugins actually clipping the sound without this showing up in the metering of the mixer.
Faulty Plugins
My first recommendation would be to bypass the plugins you think might be the culprit, and if this solves the issue, then try a different one. Sadly, not much else that can be done here.
Plugins clipping the sound
A very common beginner mistake is to add multiple plugins onto a track which may increase the signal’s level to a point where it starts clipping (adding multiple plugins is not the issue, but the signal level getting out of control is). Addressing this issue by lowering the mixer fader of that track is not the answer.
The clipping occurs because of the plugins in the chain, and lowering the signal after those plugins won’t fix the issue since you’re simply lowering the gain on an already clipping audio signal.
Make sure to not push the gain on the plugins too hard and to keep the signal throughout the entire chain below the clipping threshold.
What is the best buffer size for low latency?
The truth here is that the lower the better.
If your interface’s driver allows for 16 samples, then that’s the best one as long as it doesn’t introduce too much noise.
Furthermore, as I previously mentioned, the higher the sample rate the lower the latency, so increasing the sample rate will reduce the latency even more.
However, this is generally not recommended unless you have a very powerful computer since the CPU will be under a much heavier load the more you reduce the buffer size and the more you increase the sample rate.
Summary
If you hear a crackling noise when recording and playing back audio in FL Studio, it’s probably because of the buffer size is too small and all you have to do is go to the audio settings and increase its size slightly.
Of course, this may introduce latency, so it becomes sort of a balancing act of how much latency you’re willing to tolerate.
Fl Studio is slowly becoming one of the most popular, if not the most popular, DAWs out there today, and this is mainly due to its unique workflow that relies mostly on pattern creation and then assembling all of those patterns in the playlist to create a song.
As it so happens with many other audio recording software, FL Studio does offer a free trial that you can download and install, but is it really worth it? I installed the free trial a while back and later upgraded, but I purposely made sure to check everything I could in order to determine whether or not the free trial was enough for my needs or if I really had to upgrade.
I will say this though: Even though I upgraded to the Pro version, the free trial definitely suited my needs except for one crucial aspect, which I will go into in detail in this article.
So, without any further ado, let’s get started!
Is the Free Trial of FL Studio actually good?
The Free trial of FL Studio offers all of the available features in any other FL Studio version, such as including all of the plugins and even working for an unlimited amount of time, but it does come with some slight drawbacks such as not being able to load saved projects.
Although this limitation of not being able to load saved projects may not seem that bad for some people, imagine working for 6 hours on a project, saving it only to realize the next day that it can’t be opened back up unless you purchase the premium version.
That’s definitely not good!
The Free Trial lasts Forever
That’s right, the Free Trial literally lasts forever and comes with all of the available plugins already included (The trial installer comes with all FL Studio Edition’s Bundles in one and installs everything) and once you upgrade to one of the different versions, some plugins get activated while some others stay in that “trial” version.
This is what Image Line have to say about their trial plugins:
“Trial plugins will not retain settings when you reload a project. You will see a warning about this when saving a project with a trial plugin in it. To avoid this, simply don’t use plugins where you see ‘TRIAL VERSION’ noted in the plugin window header.”
This, for instance, happens to me when using the Synth “Harmor” and if I save and reopen the project, all of the settings get reset.
Included Features
Fully functional DAW.
Time unlimited.
All plugins are available.
Lets you load third-party plugins.
Create any song you want and export it (All of this works).
Save FL Studio Projects (but can’t reopen).
Export WAV, MP3, FLAC, MIDI and Video.
In short, you can use FL Studio’s trial version to create a beat or even an entire song, use all of the plugins and features, and export that song without ANY issues.
However, if you save the project and close FL Studio, you will have to purchase one of the versions in order to be able to reopen it.
Main Limitations
Can’t open saved projects.
No technical support.
To be honest, there aren’t many limitations to FL Studio’s free trial, especially not when compared to other DAWs like Pro Tools First, Cubase LE, Studio One Prime, and others, that limit the number of tracks you can play at the same time, number of inputs that can be recorded, if third-party plugins can be used, etc.
With FL Studio you won’t have to worry about any of this since everything works just as if you had purchased the most expensive version of the software, with the one big drawback of not being able to reopen saved projects.
Available Versions of FL Studio
Aside from the trial version, there are four versions to choose from:
Fruity ($99)
Producer ($199).
Signature ($299).
All Plugins (399).
The main difference is between the Fruity and the Producer Editions since the Fruity Edition doesn’t allow for audio recording and using audio clips, which is definitely something that you will need at some point or another.
So, I would always recommend buying the Producer edition.
As far as the Signature and All Plugins bundles go, getting those additional plugins may be worth the price difference, but you can always get thor-party ones and even free ones as well, or you may choose to upgrade to any of those later on, so the Producer edition is the one that makes the most sense.
Conclusion
The Free trial of FL Studio is excellent, especially when compared to most other DAWs out there, except for Reaper since that one is basically the full version without any limitations.
I own the Producer edition since I already own dozens of third-party plugins and don’t really need the ones that come with the other editions of FL Studio, but your needs may vary.
Still, if you decide to purchase this DAW, don’t go for the Fruity edition, it’s too limited! I’d always recommend starting with the Producer Edition and going from there.
I’ve used multiple DAWs over the years (Cubase, Nuendo, Reaper, Studio One, Cakewalk, and also FL Studio) and if there’s one thing that you should consider when choosing one or the other, aside from how good it actually is, is how hard it is to learn, if it’s intuitive or not, etc.
So, in this article, I’m going to do my best to tell you about my experience using FL Studio, its pros, and cons, how the workflow is, and if it’s easy to learn overall as well as being actually capable of producing professional-sounding music.
So, without any further ado, let’s get started!
FL Studio, is it easy to Learn?
FL Studio offers one of the most straightforward workflows for music production since it works off of patterns that can be dragged and dropped anywhere in the playlist to create the different arrangements and structures of the song.
This means that once you understand how to create those different patterns, which can be confusing at first (I’ll get into more detail about how the pattern creation works in a second), you can create a song in no time by simply dragging and dropping those patterns wherever you like.
It is worth noting that FL Studio differs from most other DAWs because it’s mainly designed for producing electronic music, Hip Hop, beats in general, etc., where synths, drum machines, any other type of virtual instrument, audio samples, etc., are used, and is not really designed for multitrack recording and mixing live-recorded instruments, and this means that if you want to create beats, for example, using only virtual instruments, FL Studio is not only a very powerful tool to do so but also makes the whole process extremely easy.
On the other hand, if you’re looking for a DAW to record, mix, and master a Rock band, for example, even though you can do it, FL Studio makes that whole process slightly more complicated than other DAWs.
Let’s take a look at how creating a song or arrangement in FL Studio goes:
Creating an Arrangement
The Arrangement basically consists of the patterns you create and how you arrange them along the playlist (see previous image), and the most important parts of this whole process happen in the Channel Rack and in the Piano Roll.
The new patterns you create will be stored to the left of the playlist and you can simply drag them to where you want them to be, or select them and then click anywhere in the playlist to paste them there.
Let’s quickly go over both of them now!
The Channel Rack (Where you add instruments)
The channel Rack is where you select the instruments you want to use, for example, an 808, a synth, Piano Plugin, etc., and you use these instruments to create patterns (either in the channel rack itself or using the piano roll).
Patterns can be comprised of a single instrument/sound or many, for example, when programming drums you may decide to have the kick, snare, and toms on the same pattern, or you may use a single pattern for each of them, that’s up to you and the song you’re making.
You can add as many instruments as you wish, or at least as many as the tracks that FL Studio allows which currently is 125.
The confusing thing about FL Studio is that in the Channel Rack is where you need to assign the Mixer track that this instrument or plugin is being routed to. For example, Kick drums to channel 1 in the mixer, snare to the second one, and so on.
This means that you can then drag and drop a pattern anywhere you like in the playlist (really, anywhere) and it will still be played back through the mixer channel it was assigned to in the Channel Rack (This is one of the areas where FL Studio differs a lot from other DAWs).
In the Channel Rack you usually create percussion patterns. If you want to be able to create melodies, then you have to open the Piano Roll.
The Piano Roll (Where you add MIDI data such as notes, harmonies, etc.)
The Piano Roll is where you input MIDI data for every instrument, allowing you to add notes, create chords, harmonies, etc., and play those back through various instruments (Synths, Pianos, Guitars, Bass, etc.).
To make things easier, you can use a MIDI keyboard to input these notes instead of doing it manually since it can be quite complicated and tedious.
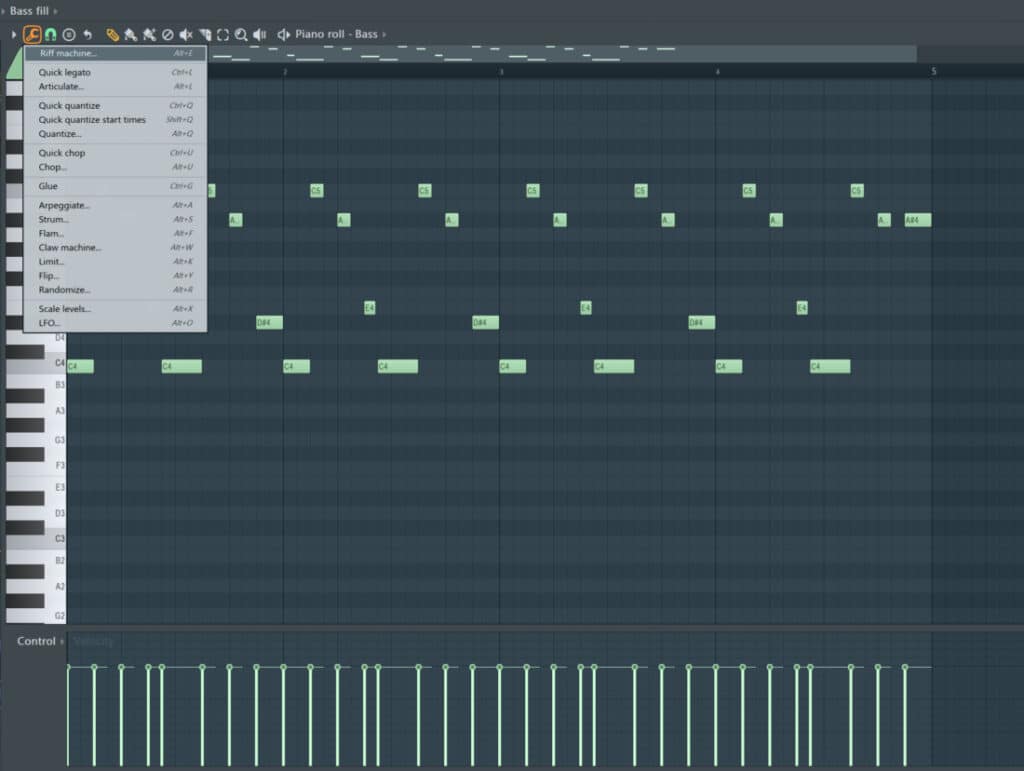
However, you can click on the dropdown menu and you get a lot of options of what to do with the notes you already input, such as arpeggiate them automatically (adds notes), randomize, articulate, and you can even select different chords, such as major, minor, major 7th, etc., and it will automatically create the chords for you in the piano roll.
The Playlist (where you place the patterns)
The Playlist is by far the simplest section to use in all FL Studio since you just need to grab the newly created patterns and drag them to wherever you like to create the structure of the song.
You can then insert automation clips and do all sorts of things, but the playlist is quite simple and intuitive to use.
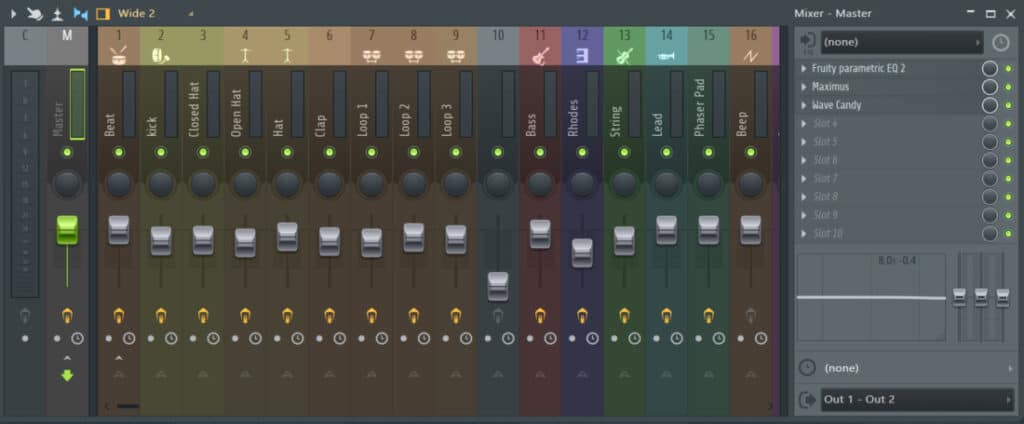
The Mixer (and channel assignment)
The mixer in FL Studio, which is where you can control the volume of each track, add effects, and basically mix the song, works in a similar way to most other DAWs but with some differences, such as:
In most DAWs, the insert and send sections are located on top of every single track, whereas in FL Studio you need to select a track and then go to the right-hand side of the mixer to insert the effects.
You can right-click on any parameter, such as the volume fader, panning knob, etc., and create automation for it, for example, as well as many other things, which is generally not as simple in other DAWs.
Channel routing can be a bit confusing at first, especially if you’re used to other DAWs.
For new users, I think that the mixer in FL Studio is not necessarily harder to learn than that of any other DAW, and having the ability to right-click on any adjustable parameter and getting a popup menu with various options to affect that parameter, is definitely intuitive and easy to use.
Recording Audio
Since FL Studio isn’t really designed to record multitracks, or in other words, entire bands, it makes the recording process a bit more difficult than other recording software.
So, on the audio recording side of things, FL Studio isn’t the simplest software.
Let’s quickly summarize all of this information in a pros and cons list to make everything easier to read and understand.
Pros
Because of the use of patterns, the workflow is very easy to understand.
It’s a very “visual” DAW that makes recognizing things easy.
Right-clicking on any parameter lets you do things with it (mainly create automation).
The included plugins are generally simple enough for beginners to understand.
Probably the most Powerful Piano Roll out there.
Cons
Recording audio can be a bit more complicated.
Each channel in the “Channel Rack’ gets routed to its specific mixer track, which can get confusing if you come from a different DAW.
Conclusion: Is FL Studio easy to learn?
I tend to recommend FL Studio to complete beginners since it’s far simpler to learn than something like Cubase or Studio One, plus it’s designed with composition and music production in mind, whereas most other DAWs are better suited for straight-up mixing and mastering.
The good thing is that FL Studio can still do all of these things incredibly well, but it makes creating songs easier (unless you’re recording a lot of audio tracks, then it might be better to go with another DAW).
All in all, FL Studio is easier to learn than most other DAWs and is way more beginner-friendly.
If you’ve ever tried recording your own vocals in FL Studio, you might have noticed that you can hear yourself through the headphones or the speakers, which is generally good since it helps you sing in tune, etc.
However, what if there is some latency? Or what if you simply don’t want to hear your voice and only the mix?
FL Studio, contrary to most other DAWs, doesn’t have a button to enable or disable this functionality, but it’s actually quite easy to do and I will quickly show you how.
How to Record Audio in FL Studio without hearing it live through the headphones
First of all, you need to know how to record audio in FL Studio in general since it’s a bit more nuanced than in other DAWs.
Click on a Mixer channel and select the input device (Input 1, Input 2, etc., which correspond to the inputs of the interface).
Click on the little dot on the Mixer channel to “Arm” it for recording.
Click on the Large red dot on FL Studio’s Taskbar (This will enable recording).
Press Play to start recording.
Once you know how to record audio, it’s time to deal with the input signal making its way into your ears in real-time.
I will quickly show you two really simple methods, starting with the easiest one of all (and the one that I would recommend the most as well).
Lower the Volume Fader
Yes, it’s that simple.
Lowering the volume fader simply means that that particular audio channel isn’t sending any audio to the master out, but it has nothing to do with the input gain, so your audio will still be recorded but you won’t be able to hear it.
Note: Return the fader level back to normal once you finished recording, otherwise when you hit play you won’t be able to hear anything.
Lower the “send” signal to the master
This is almost identical to lowering the volume of the track, but instead, you’re simply telling FL Studio how much of that track’s signal makes its way into the master, and when turned all the way to zero, no audio from that track will be heard.
Of course, the same concept applies here once you want to be able to actually listen to the recorded track since if you leave the send at zero, you won’t be able to hear anything. So, you need to increase the level back up again to listen to the recording.
Tip: You can right-click on the knob and click on “Reset” and it will reset the level.
Alternative: Disconnect the insert track from the master channel
This has the exact same effect as turning the “Send to Master” knob to zero, but you’re actually disconnecting the track from the master itself.
Here’s how to do it:
Click on the Mixer/Audio track to select it (the one armed for recording).
On the master channel click on the little triangle on top of the “Send” knob.
This should disconnect the Mixer track from the master channel and you should not be able to hear any audio from that track.
To link the channels together again, simply select the track and click on the Triangle in the Master Bus/Channel.
Conclusion
FL Studio doesn’t make muting the direct audio as simple as other DAWs since most have a single button you can click and it does it for you, but it’s still simple enough to do!
Just remember to always re-link the channels or to push the fader/send back up again in order to be able to listen to what you just recorded.